Introduction
This book contains the documentation for all my Matrix bridges. The book is built using mdBook. The source code is available in the mautrix/docs repo.
These docs are mostly targeted towards people who want to run bridges themselves. If you don't want to self-host, some bridges have public instances available (listed on the page of each bridge). Beeper also offers all of these bridges as a service.
Using bridges
This page contains a high-level overview of how to use bridges.
The first step is to decide which kind of bridge you want. Some bridges support multiple types of bridging, but hosting providers may only enable one. The most common types are puppeting and relaying.
- Puppeting means you log into the bridge with your real account on the remote network. The bridge will then automatically bridge all your chats. You can basically use Matrix as your client for other chat apps.
- Relaying means using some sort of a bot account on the remote network to bridge messages from multiple Matrix users. This is the usual method when you want to bridge individual community rooms so users can choose which side they want to be on.
mautrix bridges are primarily meant for puppeting, but relay mode exists too (or a different equivalent system in the case of Discord and old versions of Telegram).
After choosing which type of bridging you want, you'll need to find or host a bridge. There are a few different options:
- Run it yourself. This requires hosting a full Matrix homeserver, as
connecting bridges requires admin access (a friend who runs a homeserver
might let you connect bridges too, but strangers probably won't).
- The only exception to this rule is Beeper, which allows connecting self-hosted bridges. However, Beeper bridges can't be shared with other users, which means it can't be used for relaying.
- Pay someone to host it for you.
- Hosting providers like etke.cc will set up bridges for you on request.
- Find a public instance
- Beeper offers hosted instances of all of these bridges (except iMessage).
- Some bridges have public instances which anyone can use.
- Not all public instances allow all modes of bridging. For example, t2bot is only for relaying, while Beeper is only for puppeting.
- The index pages of each bridge in these docs includes a list of known public instances. See mautrix-telegram for example.
For relay bridges, you can bridge any room you want. Matrix rooms are decentralized, which means there's no such thing as the server that "hosts" a room. If you find a bridge that you're allowed to use, you can add it to any existing room.
Your own account also doesn't need to be on the same server as the bridge, so while you can't connect self-hosted bridges to public servers like matrix.org, you can have your account on matrix.org while hosting a homeserver with a bridge on another domain. However, if you host a homeserver for a bridge, you may as well use it for your main account too, it'll probably be faster than matrix.org.
After you have a bridge, you simply need to use it.
- For puppeting bridges, you should usually navigate to the "Authentication"
page for the relevant bridge and follow the instructions (which always start
with starting a chat with the bridge bot).
- Some services like Beeper have built-in setup interfaces, in such cases you can ignore the docs and just use the UI.
- For relaying bridges, you generally have to invite the bot on the remote network and then use some commands to set up the bridge.
Troubleshooting & FAQ
Debugging setup issues should be done in the Matrix rooms for the bridges (linked in the READMEs), rather than in GitHub issues. Additionally, this page will collect some of the most common issues.
Why is the bridge bot not accepting invites? (or not receiving messages from Matrix)
If the bridge starts up successfully, but inviting the bot doesn't work and the logs don't show any errors, it usually means the homeserver isn't sending events to the appservice.
In the case of mautrix-imessage, there's no need to invite the bot for setup, so this issue manifests as outgoing messages not working.
There are a few potential reasons this can happen:
- There was a misconfiguration in the appservice address/hostname/port config
or the homeserver can't reach the appservice for some other reason. The
homeserver logs should contain errors in this case (grep for
transactionsin Synapse'shomeserver.log).- Note that grepping for
transactionswill show some data even when it's working correctly. If it shows nothing at all, something is broken. - Also note that
transactionis not the same astransactions. If you don't include thesat the end, you'll get tons of unrelated logs. - For mautrix-imessage, you should also check the wsproxy logs.
- As of Synapse v1.84 and bridges released after May 2023, the bridges will automatically use the appservice ping mechanism to detect configuration issues and report them in bridge logs.
- Note that grepping for
- The bridge was down for longer than a few minutes and the homeserver backed
off. The homeserver should retry after some time. If it still doesn't work
after an hour or so (exact backoff depends on how long the bridge was down),
check the homeserver logs.
- Starting with Synapse 1.132, the ping mechanism should reset the backoff, so this problem should also go away.
- You started a chat with the wrong user ID. The user specified in
appservice->bot->usernameis the only one that will accept invites.
The bot accepted the invite, but I don't see any responses from the bridge bot in Matrix
Check the bridge logs to see if the bridge is receiving the messages and whether it's responding to them or just not handling them at all.
If there's nothing in the logs, then the homeserver may have backed off on sending transactions as per the above entry.
If there are incoming transactions in the bridge logs, but no response, it might
mean you sent an unprefixed command to a non-management room. If you started the
chat in a non-standard way instead of just creating a DM, the chat may not be
registered as your management room. In non-management rooms, commands have to be
prefixed by the command prefix defined in the config (e.g. !wa login instead
of login).
I don't see any responses from the bridge bot in Matrix, but the responses are visible in the bridge logs
Make sure you didn't ignore the bot.
Settings -> Security & Privacy -> Advanced -> Ignored users on Element.
Why are direct messages showing up under "Rooms" instead of "People"?
All chats in Matrix are actually rooms, and there's no good way for bridges to
declare that a room is a DM. Specifically, the DM status is stored in the
user's account data in the m.direct event, rather than in the room itself.
Since the flag isn't stored in the room, there's no way for the room creator
to force the room to be a DM.
The bridges include a hacky workaround, which uses double puppeting to update
the m.direct account data event directly. It can be turned on with the
sync_direct_chat_list config option. Alternatively, you can manually add
individual rooms using the /converttodm command in Element Web/Desktop.
Canonical DMs (MSC2199) should fix the issue permanently by actually storing the DM status in the room itself, but so far it has not been implemented in any clients or servers.
Why is the bridge bot in direct chats?
The bridge bot is necessary when using end-to-bridge encryption, and to keep things more consistent, it's included even in unencrypted rooms.
The bridge will send member hints to the room to tell clients to ignore the
bridge bot when calculating the room name. However, if you use a client that
doesn't support MSC4171,
you can enable private_chat_portal_meta in the bridge config to tell it to
explicitly set the room name and avatar.
Why are messages showing up as "Encrypted by a deleted session"
Also:
- "Encrypted by a device not verified by its owner"
- "The sender of the event does not match the owner of the device that sent it"
- possibly other similar warnings
All messages sent by the bridge are encrypted using the bridge bot's session even though they're sent with different accounts, which may confuse some clients.
As long as you've enabled the self_sign option under encryption, the bridge
bot should be verified, so it'll keep receiving messages even after clients stop
encrypting for unverified devices in October 2026.
The bridge could technically create a separate e2ee session for each ghost user to avoid the warning, but that would be ridiculously inefficient, so it won't happen. In the future, there will be a proper way to define that the ghost users are delegating e2ee handling to the bridge bot, which will allow clients to remove the warnings. See MSC4350 for more info.
Can I verify the bridge e2ee session?
The bridge can verify itself if you enable the self_sign option in the config.
You should set it to ensure that the bridge keeps working after clients stop
encrypting messages for unverified devices in April 2026. However, setting it is
not expected to remove the warnings mentioned in the section above.
Interactive verification is not supported, so you can't verify the bot's cross-signing keys from your own account, you can only have the bridge verify itself.
The bridge can't decrypt my messages!
It's unfortunately quite easy to misconfigure things in a way that prevents the bridge from decrypting messages. Places to start troubleshooting:
- Make sure
appserviceis set tofalsein the encryption config unless you have configured the appropriate experimental features and registration flags (or are connecting to Beeper servers). - When using next-gen auth/MAS, enabling
msc4190in the bridge config is mandatory. - Check the logs to ensure the bridge bot syncs are successful. It should log
a sync request every 30 seconds on the debug level even if there's no
activity, and the status code should always be
200.- Synapse has some bugs where
/syncstarts throwing internal server errors after previously working fine. If that happens, the easiest workaround is to get the latestsince/next_batchtoken (e.g. from your own client, they're global) and insert it into thecrypto_accounttable in the bridge database. - If you get HTTP 500 or 501 errors on a brand new bridge and you created the registration file manually, you likely did it wrong. See the e2be docs or regenerate the file using the bridge.
- When using appservice mode, there won't be any
/syncrequests. Instead you should seeStarting handling of transactionlogs withunstable_to_deviceordevice_changeskeys.
- Synapse has some bugs where
- Make sure you haven't enabled "Never send encrypted messages to unverified sessions" or similar options in your client. The options usually exist both in global settings and in room settings.
- Try
/discardsession(available on Element Web at least) and see if there are any new kinds of errors in the bridge logs when you next send a message (the client will share a new megolm session, which should show up in the logs).
The bridge doesn't start after I enabled next-gen auth (OAuth/MAS)
With failed to get supported login flows or homeserver does not support appservice login as the error message.
As mentioned in both the config comments and the e2be docs, you have to enable MSC4190 mode if the homeserver is using next-gen auth.
How do I bridge typing notifications and read receipts?
The bridges use MSC2409 to receive ephemeral events (EDUs) from the Matrix homeserver and bridge them to the remote network. It is enabled by default in new bridge instances, but old ones may need to update the bridge config and/or registration file manually.
On the bridge side, the config field is appservice -> ephemeral_events.
The registration file given to the homeserver must also have the
receive_ephemeral field set to true (or if the server implements the pre-spec
version, de.sorunome.msc2409.push_ephemeral). If it's not set, you can either
set it manually, or regenerate the registration after setting ephemeral_events
to true in the bridge config. Remember to restart the homeserver after modifying
the registration file.
Previously there was an option to use /sync with double puppeting to receive
ephemeral events without MSC2409 support. However, that option is being phased
out, so MSC2409 is the only option now.
Why are contact list names disabled by default?
Some bridges like WhatsApp and Signal have access to the contact list you've uploaded to their servers. However, the bridges will not use those names by default. The reason is that they cause problems if your bridge has multiple Matrix users with the same people in their contact lists.
- Contact list names might be leaked to other Matrix users using the same bridge.
- Per-room displaynames could somewhat mitigate this, but even that wouldn't work if you're in some bridged groups with the other Matrix users.
- Bridge ghosts might flip between names from different Matrix users' contact lists.
If the bridge only has one user, then contact list names should be safe to enable.
mautrix-whatsapp: Messages in some groups are no longer bridged
...even though it worked before. The logs say
M_EXCLUSIVE (HTTP 400): Invalid user localpart for this application service
This happens to bridges that were set up before the v0.5.0 release due to WhatsApp's migration away from phone numbers as the primary internal identifier.
Instead of @whatsapp_<phonenumber>:example.com, user IDs will take the form
@whatsapp_lid-<randomnumber>:example.com. However, prior to v0.5.0, the bridge
would generate registrations where the user ID regex was @whatsapp_[0-9]+,
which doesn't allow the new format. To make the bridge work in groups that
WhatsApp has migrated to LIDs, you must ensure that registration.yaml has
.+ or .* in the regex, not [0-9]+.
When editing the registration file, make sure you edit the file that your homeserver is reading, as you may have copied the file from the bridge's data directory to the homeserver's. The bridge itself never reads the registration file, so updating the wrong file will do nothing.
After updating the registration and restarting your homeserver, messages in
groups should start working immediately. You can also use the !wa sync groups
command to fix group member lists immediately.
mautrix-gvoice: unexpected status code 429 (electron status: unavailable)
This error usually happens for non-workspace accounts when trying to send a
message. As mentioned in the setup instructions, mautrix-gvoice requires having
access to the electron binary, which is not available in Docker.
If the error says electron status: ok instead of unavailable, then there's
something else wrong.
pip failed building wheel for python-olm
fatal error: olm/olm.h: no such file or directory
When building with end-to-bridge encryption, you must have a C compiler, python3 dev headers and libolm3 with dev headers installed.
If you want to build without encryption:
- For Python bridges, don't install the
e2beoptional dependency. - For Go bridges, either build with
-tags nocryptoor disable cgo with theCGO_ENABLED=0env var.
fatal error: olm/pk.h: no such file or directory
libolm2 is too old, you need libolm3.
fatal error: pyconfig.h: no such file or directory
python3-dev is required.
error: command 'gcc' failed: No such file or directory
build-essential is required.
Configuration error: <field> not configured
You didn't change the value of <field> in the config, but that field must be
configured for the bridge to work (i.e. the default value will not work). Dots
in <field> mean nesting, e.g. bridge.permissions means the permissions
field inside the bridge object.
ForeignTablesFound: The database contains foreign tables
As mentioned in the setup page, you should not share a single Postgres database between unrelated programs.
You can create a separate database either using the createdb shell command
that is usually included with Postgres, or the CREATE DATABASE SQL statement.
After creating a separate database, adjust the database URI in the bridge config.
For existing installations, you can use the CLI flag to ignore the error (see
--help) and hope that there are no table name conflicts in the future. To use
the flag in Docker, you'll have to override the startup command, either with a
copy of the docker-run.sh script (which can be found in the bridge repo), or
just the startup command (python3 -m mautrix_$bridge -c /data/config.yaml --flags).
The as_token was not accepted
The error means the bridge was able to connect to the configured homeserver, but the homeserver rejected the bridge's token. A few different ways the tokens might be wrong:
- The registration file wasn't added to the homeserver config.
- The homeserver wasn't restarted after adding the registration file.
- The tokens were modified (in either of the files) and weren't copied to the
other file, or either side wasn't restarted after modification.
- Generating a new registration file always modifies the tokens.
- When using Docker, the container will generate a new registration on startup if the file doesn't already exist (the container won't check the file contents, just the existence).
- The homeserver URL is wrong and the bridge is connecting to an entirely different server than where the registration is.
- You're looking at the wrong files and didn't actually make changes to the correct ones.
The as_token was accepted, but the /register request was not
This error can happen through a few different misconfigurations. Unfortunately the homeserver doesn't tell more specifically. The possible misconfigurations are:
- having the incorrect value in
homeserver->domain- This is the most common issue. The domain must match the
server_namein your homeserver's config. If it doesn't, fix it, regenerate the registration file and restart everything.
- This is the most common issue. The domain must match the
- changing the bot username without regenerating the registration
- having another appservice registration exclusively claiming the same namespace.
Homeserver -> bridge connection is not working
At startup, the bridge will ask the homeserver to check that it can reach the bridge. If the homeserver reports an error, the bridge will log the error and exit. This ensures that it's actually working if the bridge runs successfully, rather than being silently broken by not receiving messages. This mechanism is called "appservice ping".
The error message associated with this log is the error that the homeserver (e.g. Synapse) encountered while connecting to the bridge. It is not an error from the bridge itself.
To fix the error, ensure that your homeserver can reach the bridge at the
configured address. The address is configured in the appservice -> address
field in the bridge config, although in reality the homeserver reads it from
the url field in the registration file that you gave to the homeserver. The
bridge config field is just copied to the registration when the registration
is generated. If you change the value, you can either manually update the
registration, or regenerate it completely.
Why is the latest release old?
When bridges are being actively developed, releases are effectively always outdated. The main branch is generally stable and safe to use in production, although automatic unattended upgrades are not recommended. Bugs should only be reported on the main branch.
New releases for Go bridges happen on the 16th of each month. Sometimes releases may be skipped if there's something blocking the release or if nothing relevant has changed since the last one. Releases outside of the standard cycle only happen if there are severe security issues that must be fixed immediately, or in some cases if the remote network has made significant breaking changes.
Anything older than the latest release is completely unsupported and there won't be any patches even for security issues.
Python bridges do not have a release cycle, releases will happen randomly.
the supplied account key is invalid
This error means that the pickle_key specified in the config is incorrect.
Old versions of bridges used to have a hardcoded key, but new versions generate
a random one and save it in the config.
If you're upgrading from an old version, the legacy migration should
automatically copy the old hardcoded key into the config file. However, if you
prevented the migration from writing the config, you may need to manually set
it. You can find the correct old key in the legacymigrate.go file under the
cmd directory in each bridge. Newer releases of some bridges have already
removed the legacy migration support, so you may need to check older releases
for it.
If you get the error even though you set up the bridge recently and didn't migrate from an old pre-megabridge version, it's likely you prevented the bridge from writing to the config and didn't set a random key yourself. If the pickle key is lost, the database will have to be reset.
Registering appservices
All the bridges here use the Matrix Application Service API. It's mostly the same as the client-server API, but there are a few key differences. Primarily, it means that the bridges
- can control any user ID in a predefined namespace, e.g. all user IDs starting
with
@telegram_and ending with:yourserver.com, - don't have rate limits, and
- have events pushed to them via HTTP, instead of pulling with long polling like normal Matrix clients do.
To get these special privileges, the bridge must be registered on the homeserver as an appservice. In general, this requires root access to the server. Instructions for individual homeserver implementations can be found below.
All of the instructions below require you to have the registration.yaml file
ready, so make sure you've reached the point in the bridge setup instructions
where it tells you to register the bridge on your homeserver.
The registration file is only necessary for the homeserver. None of the mautrix bridges will try to read it at runtime, as all the relevant information is also in the bridge-specific config file. However, this also means that if you change certain config fields, you must regenerate the registration file (or manually apply the relevant changes). The config fields that affect the registration are:
homeserver->domainappservice->addressappservice->bot_username(orbot->usernamein Go bridges)appservice->ephemeral_eventsappservice->idappservice->as_tokenappservice->hs_tokenappservice->username_templateencryption->appservice
Synapse
If necessary, copy the registration file somewhere where Synapse can read it.
Then add the path to the file under app_service_config_files in Synapse's
homeserver.yaml file. The field must be an array of strings, for example:
app_service_config_files:
- /data/mautrix-telegram-registration.yaml
After updating the config, restart Synapse to apply changes. If you change or regenerate the registration file, you will need to restart Synapse every time.
If Synapse fails to start after editing the config, it means you either made a YAML syntax error, or the file path is incorrect or not readable. See the Synapse logs to find out what went wrong exactly.
Some things to keep in mind:
- When using Docker, the file needs to be mounted inside the container
- If Synapse is running through systemd, the service file might have security hardening features that block access to certain paths.
Beeper
Follow the instructions at github.com/beeper/bridge-manager.
Dendrite
N.B. Dendrite is not a supported environment, as it often has serious bugs. It is strongly recommended to use Synapse instead. Conduit-based servers like continuwuity are also fine.
Dendrite works the same way as Synapse, except the relevant config field is
config_files under app_service_api
(and the config file is usually called dendrite.yaml rather than homeserver.yaml):
app_service_api:
    ...
    config_files:
    - /data/mautrix-telegram-registration.yaml
Conduit
Also applies to Conduit-based servers such as continuwuity.
Conduit doesn't use a config file, instead it has an admin command for
registering appservices. Go to the admin room (which is created automatically
when the first user is registered on the server), copy the contents of the
registration YAML file, then send a register_appservice command:
@conduit:your.server.name: register_appservice
```
paste registration.yaml contents here
```
(replacing your.server.name with the server name. You can also use tab
autocompletion to mention the @conduit user in most clients).
You can confirm it worked using the list_appservices command (which should
show the id field of the just registered appservice):
@conduit:your.server.name: list_appservices
See also: https://gitlab.com/famedly/conduit/-/blob/next/APPSERVICES.md
N.B. Due to some spec ambiguities, you have to register the bridge bot account manually when using Python-based bridges (Google Chat) with Conduit-based servers. Go bridges do not require this extra step.
End-to-bridge encryption
The bridge can optionally encrypt messages between Matrix users and the bridge to hide messages from the homeserver. The use cases for this are:
- Storing messages encrypted on disk rather than in plaintext.
- In unencrypted rooms, events are stored in plaintext in the homeserver database.
- E2BE can be configured to delete keys immediately after encrypting/decrypting, which means the server being compromised in the future won't compromise old bridged messages.
- Preventing the server from seeing messages at all when bridges are hosted locally:
- When using Beeper, you can self-host bridges locally and connect them to the Beeper servers. End-to-bridge encryption means the Beeper servers never see messages.
- If you have your own homeserver on a cloud VPS, you can host bridges on a local raspberry pi or similar to ensure your cloud provider can't see messages.
Traffic from the bridge to remote network always follows the remote protocol as if the bridge was a native client. For example, messages sent to Signal are always encrypted between the bridge and Signal clients.
Basic usage
To enable it, you must install the bridge with dependencies:
- For Python-based bridges, install the
e2beoptional dependency. - For Go-based bridges, make sure the bridge is built with libolm.
- CI binaries from mau.dev and release binaries on GitHub are always built with libolm.
- Docker images for all bridges always support encryption and don't need any special build flags.
After that, simply enable the option in the config (top-level encryption in
new bridges, bridge → encryption in old ones). If you only set allow: true,
the bridge won't enable encryption on its own, but will work in encrypted rooms.
If you also set default: true, the bridge will automatically enable encryption
in new portals.
If your homeserver is configured to forcibly enable encryption in rooms, you
must also set default: true in the bridge config. Force-enabling encryption
on the server side will not notify the bridge, so unless the bridge enables
encryption by default, the bridge will not find out that encryption was enabled.
Appservice (/sync-less) mode
Setting appservice: true is not recommended, but should work as long as you're
using Synapse 1.141 or higher, v25.10 or higher of the bridge, and have enabled
the relevant experimental features in the homeserver config and appservice
registration. The registration flag is org.matrix.msc3202: true and the
Synapse experimental features are:
experimental_features:
  msc3202_transaction_extensions: true
  msc2409_to_device_messages_enabled: true
Use with next-gen auth (OAuth, MAS, MSC4190)
The encryption -> msc4190 config option must be set to true for encryption
to work if you use next-gen auth.
You don't actually need to use next-gen auth to use MSC4190, so you can enable
it already before migrating to MAS to make sure bridges keep working. Enabling
MSC4190 is also recommended if you use the self_sign option, as it allows the
bridge to reset its cross-signing keys.
Instructions for legacy Synapses (pre-v1.141)
For Synapse versions prior to 1.141, you also need to set io.element.msc4190: true
in the bridge registration.yaml file, as well as enable the MSC3202 device
masquerading experimental feature:
experimental_features:
  msc3202_device_masquerading: true
Additional security
The bridges contain various additional options to configure how keys are handled. For maximum security, you should set:
default: trueandrequire: trueto reject any unencrypted messages.- All fields except
delete_outbound_on_ackunderdelete_keystotrueto ratchet/delete keys immediately when they're no longer needed. This prevents the bridge (and bridge admin) from reading old messages. - All fields under
verification_levelstocross-signed-tofu. This means only devices with valid cross-signing verification can use the bridge.
Note that the delete_keys options may cause issues if your client is buggy.
In particular, if a client either uses an old megolm session after sharing a new
one or uses a megolm session past its expiry, the bridge will throw an error
saying your client used an outdated encryption session. If you want to use
such buggy clients, you should not enable any of the options under delete_keys.
When using cross-signed-tofu as the verification level, users who change their
cross-signing keys will no longer be able to interact with the bridge. You can
either set first_seen_key=key in the crypto_cross_signing_keys table for that
user, or use cross-signed-untrusted instead of -tofu to trust the keys
automatically.
Legacy / manual registration instructions
If you want to use encryption in the standard /sync mode (as opposed to the experimental appservice mode) and your registration file is extremely old (pre-2021) or you created it manually instead of letting the bridge generate it, you'll have to apply workarounds for Synapse bugs.
In particular, sender_localpart should be set to a random string. The value is
irrelevant as it's not used for anything, but the important thing is that it
must NOT be the bridge bot username. Instead, the bot user should be included in
the users namespace regexes, like so:
sender_localpart: irrelevantrandomvalue
namespaces:
   users:
   - exclusive: true
     regex: '@telegram_.*:your\.homeserver'
   - exclusive: true
     regex: '@telegrambot:your\.homeserver'
Double puppeting
By giving the bridge access to your Matrix account, you can replace the Matrix ghost of your remote account. When you do so, messages that you send from other clients will be sent from your real Matrix account instead of the default ghost user. In most of the bridges, this is necessary to bridge DMs you send from other clients to Matrix.
Benefits of double puppeting:
- Automatically accept invites to new chats.
- Bridge messages you send from the native app in direct chats.
- Bridge messages you send from the native app as your Matrix real user instead of the bridge's ghost user.
- Optionally sync some details like low priority, favorites, mute status and direct chat status.
Using double puppeting (specifically the automatic method) is recommended whenever possible.
Automatically
Instead of requiring everyone to manually enable double puppeting, you can give the bridge access to enable double puppeting automatically. This makes the process much smoother for users, and removes problems like access tokens getting invalidated.
Previously there were multiple different automatic double puppeting methods, but the older methods are deprecated and were completely removed in the megabridge rewrites. Only the new appservice method is now supported.
Automatic double puppeting should work on all homeserver implementations that
support appservices. However, some servers don't follow the spec, and may not
work with a null url field.
Using appservices means it requires administrator access to the homeserver, so it can't be used if your account is on someone elses server (e.g. using self-hosted bridges from matrix.org). In such cases, manual login is the only option.
This method also makes timestamp massaging work correctly and disables ratelimiting for double puppeted messages.
-
First create a new appservice registration file. The name doesn't really matter, but
doublepuppet.yamlis a good choice. Don't touch the bridge's main registration file, and make sure the ID and as/hs tokens are different (having multiple appservices with the same ID or as_token isn't allowed).# The ID doesn't really matter, put whatever you want. id: doublepuppet # The URL is intentionally left empty (null), as the homeserver shouldn't # push events anywhere for this extra appservice. If you use a # non-spec-compliant server, you may need to put some fake URL here. url: # Generate random strings for these three fields. Only the as_token really # matters, hs_token is never used because there's no url, and the default # user (sender_localpart) is never used either. as_token: random string hs_token: random string sender_localpart: random string # Bridges don't like ratelimiting. This should only apply when using the # as_token, normal user tokens will still be ratelimited. rate_limited: false namespaces: users: # Replace your\.domain with your server name (escape dots for regex) - regex: '@.*:your\.domain' # This must be false so the appservice doesn't take over all users completely. exclusive: false -
Install the new registration file the usual way (see Registering appservices).
-
Finally set
as_token:$TOKENas the secret indouble_puppet->secrets(e.g. if you haveas_token: meowin the registration, setas_token:meowin the bridge config).double_puppet: ... secrets: your.domain: "as_token:meow" ...N.B. For old bridges, the map is
bridge->login_shared_secret_map.
If you set up double puppeting for multiple bridges, you can safely reuse the same registration by just setting the same token in the config of each bridge (i.e. no need to create a new double puppeting registration for each bridge).
This method works for other homeservers too, you just have to create a new
registration file for each server, add the token to secrets, and also add
the server address to the servers map (for the bridge server, adding to the
server map is not necessary as it defaults to using the one configured in
homeserver -> address).
Manually
Double puppeting with the manual method can only be enabled after logging into the bridge. As with the normal login, you must do this in a private chat with the bridge bot.
Automatic double puppeting is recommended. This method is mostly a fallback in case your account is on a different server where you can't use automatic double puppeting.
N.B. This method is not currently supported in mautrix-imessage.
- Log in on the homeserver to get an access token, for example with the command
You may want to change the$ curl -XPOST -d '{"type":"m.login.password","identifier":{"type": "m.id.user", "user": "example"},"password":"wordpass","initial_device_display_name":"a fancy bridge"}' https://example.com/_matrix/client/v3/logininitial_device_display_namefield to something more descriptive, or rename it from another client after logging in.- In the past, getting a token from an existing client like Element was the recommended easy way. However, multiple clients using the same token can cause issues with encryption, so doing that is no longer allowed.
- Send
login-matrix <access token>to the bridge bot. For the Telegram bridge, sendlogin-matrixwithout the access token, then send the access token in a separate message. - After logging in, the default Matrix ghost of your remote account should leave rooms and your account should join all rooms the ghost was in automatically.
Manually with SSO
If you only have SSO login on your homeserver, the above example with password login won't work. However, doing SSO login manually is still possible, just a bit more work.
- Open
https://example.com/_matrix/client/v3/login/sso/redirect?redirectUrl=http://localhost:12345in a browser. The redirect URL at the end doesn't have to be a real server, since you can just copy the relevant value in the browser URL bar after the redirect. - Go through the SSO process, then once it redirects to localhost:12345, copy
the value of the
loginTokenquery parameter. - Log into the homeserver with the login token:
$ curl -XPOST -d '{"type":"m.login.token","token":"THE TOKEN","initial_device_display_name":"a fancy bridge"}' https://example.com/_matrix/client/v3/login - Follow steps 2 and 3 of the normal password login instructions.
Backfilling messages
Most bridges here support fetching old messages and backfilling them into the Matrix room. However, the level of support and config options vary a lot between bridges.
In general, backfill happens automatically, and the recommended way to do
backfilling is to configure the bridge the way you want before starting to use
it. Some legacy bridges also have a backfill command, but automatic backfill
is better due to the Matrix limitations mentioned in the section below.
How backfilling works
Bridges can set the timestamp of each message they send, which is the basic principle behind backfilling. This mechanism is called timestamp massaging.
Matrix doesn't give bridges any way to actually insert messages into the room history, which means backfilled messages always appear at the "end" of the room, even if their timestamps say they're older. In other words, historical message backfill only works in new empty rooms, because backfilling older messages would cause them to be in the wrong order. Messages that were missed while the bridge was offline can also be backfilled in existing rooms, but that behavior usually doesn't need configuring, so most of this page talks specifically about backfilling historical messages.
MSC2716 used to be a method for inserting messages into room history, but the original goal of migrating Gitter history to Matrix ended up being done without actual backfill just using timestamp massaging, so the Element/Synapse developers working on MSC2716 decided to abandon it. Beeper (who develops these bridges) also doesn't use Synapse for bridged rooms, which means there's nobody left to work on MSC2716. Support for MSC2716 has been removed from Synapse and the bridges. Some bridges may still have config options mentioning MSC2716, but those will be replaced with Beeper-specific options in the future.
A future spec proposal may enable true backfilling again, but currently it seems unlikely that anyone would want to spend time to figure out the federation-related issues that MSC2716 encountered, as well as making the API easy to use for bridges.
Quirks of backfill in different bridges
WhatsApp primarily uses "history sync" blobs, which the phone automatically sends to linked devices soon after successfully linking. If backfill is enabled, the bridge will temporarily save those messages to the database, and delete them once it has either backfilled the chat or found that the room already has messages and backfill isn't possible anymore. There's no way to re-request the initial history sync blobs, so if backfill is disabled or something goes wrong, the only way to retry is to log out and back in.
Additionally, the WhatsApp bridge currently only supports backfilling in newly created rooms. If you log out and log back in, it does not backfill missed messages in existing portals even if it's technically possible (i.e. when there haven't been any new messages).
If max_initial_conversations is set to zero or higher, messages in chats
without portal rooms will be stored in the bridge database until the room is
created for some other reason (like a new incoming message), at which point
backfill will happen and the messages will be deleted. The field defaults to
-1 (= create all chats), which means messages won't be stored for long with
the default configuration.
The amount of history sent by the phone depends on what the linked device
requests: web clients request 3 months, while desktop clients request 1 year.
The amount requested by the bridge can be configured using the
request_full_sync and full_sync_config config options. Note that the full
sync fields do not affect how much is actually backfilled: if you want more
messages, you must also change the max_initial_messages option.
More recently, WhatsApp has also added on-demand history syncs, but those are not yet implemented in the bridge. On-demand history sync wouldn't be particularly useful in most cases, as messages can't be inserted into the history anyway. It would primarily be useful if something goes wrong in the initial backfill, or when receiving a message in a very old chat that wasn't included in the initial history sync blob.
Signal
Similar to WhatsApp, Signal does a one-time history transfer from the primary device to the bridge after linking. Signal's history transfer feature is very recent. If both your Signal app and the bridge are up-to-date, the app will ask whether you want to transfer history immediately after scanning the QR code. If you choose to transfer history, the bridge will download the blob, store it in the database temporarily and send them over to Matrix.
The history transfer includes all messages, but media will only work if it was sent in the past 45 days. In the future, Signal may add paid plans to preserve media for longer on the server and/or a way to request media from the phone on demand.
Initial bridge config
These bridges contain quite a lot of configuration options. This page is meant to help with finding the important ones that must be changed when setting up a bridge, as well as highlight some options that are usually useful.
For information about fields not mentioned here, refer to the comments in the config itself. The config is designed to be self-documenting and the bridge will also keep it up to date by rewriting the config on every startup by default.
If you disable the config rewriting, you can also find the example configs here:
- mautrix-gmessages
- mautrix-whatsapp
- mautrix-telegram
- mautrix-linkedin
- mautrix-bluesky
- mautrix-twitter
- mautrix-gvoice
- mautrix-signal
- mautrix-slack
- mautrix-zulip
- mautrix-meta
- mautrix-irc
Mandatory fields
When setting up a bridge, some fields have default example values, and must be changed to match your setup. The bridge simply won't work without them, and if you forget any of them, the bridge won't start up successfully and will print errors in logs.
homeserver->address- the address that the bridge can use to connect to your homeserver (like Synapse or Conduit). This should usually be a localhost or internal docker network address (likehttp://localhost:8008orhttp://synapse:8008).- If you use workers, then it should probably point at your reverse proxy, but you can still configure your reverse proxy to expose a local non-TLS interface with the same routing rules as the public TLS interface.
homeserver->domain- the domain of the homeserver. This is always the same asserver_namein the homeserver config, it is not affected by any reverse proxies, docker networking or other such things.- If you're using Docker, you'll have to change
appservice->addresstoo. That address is what the homeserver will use to connect to the bridge.localhostwon't work in Docker, but container names do (e.g.http://mautrixbridge:29318), as long as the bridge and homeserver are in the same Docker network.- Note that the
addressfield only affects the generated registration file. The host/port where the bridge listens are the two fields below address, but those usually don't need to be changed.
- Note that the
- The database config has an example postgres URI, which obviously won't work.
You can either point it at a real Postgres database, or change it to use
SQLite. Postgres is recommended if you have multiple users, but SQLite is
fine for small instances.
- Never point the bridge at another program's (like synapse's) database. When using Postgres, you can create a new database in an existing Postgres instance.
- In
bridge->permissions, you'll have to change the examples to match your server.
Bridge-specific mandatory fields
mautrix-telegram
The Telegram bridge requires that you create an "app" at https://my.telegram.org/apps
and provide the api_id and api_hash in the config. Telegram is often picky
about the details you provide and will just give a generic ERROR popup. If
that happens, try changing the values around until it works. URL and description
seem to be optional, names probably work best if they don't include telegram.
API keys don't grant access to any Telegram account, they're just required to connect to the API in the first place. Login happens afterwards using bridge commands. The bridge can be used to log into any account regardless of whose account the API keys were created on.
mautrix-meta
The Meta bridge is effectively two bridges in one codebase: Facebook Messenger and Instagram DMs. By default, it'll let you log into any type of account. Optionally, you can limit it to a single type to have separate bridges for Messenger and Instagram. If doing so, you might also want to change the fields listed below to customize the bridge bot appropriately for the service you're using.
List of fields
network->modeappservice->idappservice->bot->usernameappservice->bot->displaynameappservice->bot->avatar- Instagram:
mxc://maunium.net/JxjlbZUlCPULEeHZSwleUXQv - Messenger:
mxc://maunium.net/ygtkteZsXnGJLJHRchUwYWak - Facebook:
mxc://maunium.net/uvPDxOQGCvGbPsYDiuHlNiiE
- Instagram:
appservice->username_template
If you're duplicating an already-working bridge config, also remember to change
the appservice port and database URI (you can't share one database for two
bridges). The as_token and hs_token will be regenerated when you generate
a new registration.
Other useful things
- Setting up double puppeting is strongly recommended. The relevant config
field for automatic double puppeting is
double_puppet->secrets.- If you only set it up for your own server, you don't need to touch
the
serversmap, that's only for remote servers.
- If you only set it up for your own server, you don't need to touch
the
- End-to-bridge encryption works best if set up before logging into the bridge, because there's currently no proper way to enable encryption in existing rooms.
- Most bridges have some automatic portal creation and message backfill,
so checking the
bridge->backfillsection is recommended. Backfilling after creating rooms is not possible, so it has to be configured to your liking before logging in.- Related to backfill, most bridges also have options to specify how many
chats to backfill initially. Those options are under the
networksection.
- Related to backfill, most bridges also have options to specify how many
chats to backfill initially. Those options are under the
Relay mode
All megabridges support relay mode with the same mechanism: a specific login can be designated as a relay, which will be used for bridging messages from users who haven't logged into the bridge.
- Enable relay mode by setting
bridge→relay→enabledtotruein the bridge config. Also make sure that the users you want to invite have at least therelaylevel in thepermissionssection.- By default,
admin_onlyis true, which means only bridge admins (as defined by thepermissionssection) can set a relay. If you want room admins to also be able to set themselves as a relay, setadmin_onlytofalse.
- By default,
- Log into the bridge normally using the relaybot account.
- For most use cases, you will want a dedicated Matrix account for the login rather than doing it on your main account. See the "Shared relays" section below for details.
- Run
!prefix set-relayin the chats where you want to use the relaybot, replacing!prefixwith the appropriate command prefix for the bridge, like!signalor!wa. You can also useset-relay <login ID>to choose a specific login to be the relay (uselist-loginsto find login IDs). - Use
!prefix set-pl 100to be able to modify room settings and invite others.
Note that reactions from relayed users will not be bridged at all, because the bot wouldn't be able to bridge sender info nor multiple reactions of the same emoji.
Shared relays
Relays are only used for users who have not logged into the bridge (or whose logins are not present in the room). This means that the user who is marked as a relay won't use the relay themselves. Instead, their messages will be sent without the displayname prefix that relayed users get.
If you want everyone to be relayed, you should make a dedicated Matrix account
that will run the login command. A dedicated Matrix account in this context
means a normal new Matrix user. It is not related to the bridge bot or any other
bridge-managed account in any way. If you want relay bridges to multiple
different chat networks, you can safely share the dedicated relay account
between all bridges.
By default, only admins can set relays. If you want to set up a shared relay
account that anyone can enable, add the login ID (from list-logins) to the
default_relays list in the config after logging in. Alternatively, you can
set admin_only to false to allow anyone to set themselves as a relay.
Bridging existing rooms
If you want to bridge existing rooms, you can use the !prefix bridge command
in v26.04 and up.
The bridge command takes one or two parameters: first optionally the login ID
to use and second the internal chat ID on the remote network. If a login ID is
not provided, the command will use either the sender's default login, or the
first valid login in the default_relays config. Internal chat IDs can be found
with !prefix id in existing portal rooms, or by looking at the portal table
in the database.
You may also want to add the relay login IDs to bridge → portal_create_filter
→ always_deny_from_login in order to prevent automatic portal room creation.
If a portal room is already created, a bridge admin or room admin in the existing
portal is required to unbridge it.
When the command is used with a login listed in default_relays, it will
automatically apply set-relay as well.
Note: if relay → allow_bridge is set to false, then default relays will
not be used.
Bridge-specific notes
Telegram
Telegram minigroup portals can't be shared between multiple Matrix users, which
means if you use both a relay bot and real user logins, they'll have different
Matrix rooms for the same minigroup. If you want the portal to be shared,
upgrade the group to a supergroup using !tg upgrade (or toggle one of the
settings on the Telegram side which require a supergroup).
Internal chat IDs have the format <peer type>:<id>, where peer type is user,
chat or channel. Supergroups are channels, chat is only for minigroups.
The <id> part is the plain ID, without bot API prefixes like -100. IDs
are always positive integers.
Legacy bridges
Some of the legacy bridges that haven't been rewritten as Megabridges yet have slightly different system. In particular
- Telegram's Python version (pre-v26.04) has relay bots
- Discord has relay webhooks
- iMessage doesn't require using
set-relay, enabling it in the config will enable relay in all chats. - Google Chat doesn't support relay mode at all
Bridge setup with Docker
Please select a bridge above. If you don't select a bridge, you'll have to
manually replace occurrences of $bridge with the correct name before running
commands. The selector requires JavaScript to replace text.
This page contains instructions for setting up the bridge in Docker. To set up the bridge outside of Docker, see the language-specific instructions: Python, Go (to find out which bridge language the bridge you want is written in, check the sidebar to see which section it's under).
If you need help with setting up the bridge, you can ask in the Matrix room: #$bridge:maunium.net. For help with setting up other parts like the homeserver that aren't the bridge, refer to their documentation to find support rooms.
Requirements
- Docker
- A Matrix homeserver that supports application services (e.g. Synapse) You need access to register an appservice, which usually involves editing the homeserver config file.
- mautrix-whatsapp: A WhatsApp client running on a phone or in an emulated Android VM.
- mautrix-signal: A Signal client that can add linked devices (both official mobile apps and some unofficial clients like signal-cli work).
Setup
Docker images are hosted on dock.mau.dev. Available docker tags are generally
:latest, :git tag, :git commit-amd64 and :git commit-arm64. The latest
and git tag specific docker tags are manifests that contain both amd64 and
arm64 images. :latest points at the latest commit, not the latest release.
- Create a directory for the bridge and cd into it:
mkdir mautrix-$bridge && cd mautrix-$bridge.
N.B. The docker image willchownits/datadirectory to UID 1337. The commands below mount the working directory as/data, so make sure you always run them in the correct directory. - Pull the docker image with
docker pull dock.mau.dev/mautrix/$bridge:<version>. Replace<version>with the version you want to run (e.g.latestorv25.11). - Run the container for the first time, so it can create a config file for you:
docker run --rm -v `pwd`:/data:z dock.mau.dev/mautrix/$bridge:<version>`pwd`will mount the working directory as/data. Make sure you always run the command in the directory you created, or alternatively use an absolute path instead of pwd, e.g.-v /path/to/mautrix-$bridge:/data. - Update the config to your liking. See the initial bridge config
page for recommendations.
- Keep in mind that
localhostis not the correct address inside Docker (unless usingnetwork=hostmode). Usually you should have the bridge and homeserver in the same Docker network, and use the container names as addresses (e.g.http://mautrix-$bridge:$bridgeportandhttp://synapse:8008). - Make sure you don't share databases between unrelated programs. Shared postgres instance is fine, but shared database is not.
- Keep in mind that
- Generate the appservice registration by running the container again, same command as above.
- Register the bridge on your homeserver (see Registering appservices).
- Run the bridge:
Additionally, you should either add the bridge to the same Docker network as Synapse withdocker run --restart unless-stopped -v `pwd`:/data:z dock.mau.dev/mautrix/$bridge:<version>--network=synapsenet(when both are running in Docker), or expose the correct port with-p $bridgeport:$bridgeport(when the homeserver is outside Docker). - After the bridge is running, refer to the bridge-specific Authentication page to start using it.
Upgrading
- Pull the new version (setup step 1)
- Start the new version (setup step 6)
Docker compose
- Create a directory for the bridge like step #0 in the Docker CLI instructions above.
- Create
docker-compose.ymlthat contains something like this:version: "3.7" services: mautrix-$bridge: container_name: mautrix-$bridge image: dock.mau.dev/mautrix/$bridge:<version> restart: unless-stopped volumes: - .:/data # If you put the service above in the same docker-compose as the homeserver, # ignore the parts below. Otherwise, see below for configuring networking. # If synapse is running outside of docker, you'll need to expose the port. # Note that in most cases you should either run everything inside docker # or everything outside docker, rather than mixing docker things with # non-docker things. #ports: #- "$bridgeport:$bridgeport" # You'll also probably want this so the bridge can reach Synapse directly # using something like `http://host.docker.internal:8008` as the address: #extra_hosts: #- "host.docker.internal:host-gateway" # If synapse is in a different network, then add this container to that network. #networks: #- synapsenet # This is also a part of the networks thing above #networks: # synapsenet: # external: # name: synapsenet - Follow the rest of the Docker setup, but use compose commands instead of the
raw
dockercommands:docker compose up -dto start,docker compose stopto stop anddocker compose pullto update. Keep in mind thatdocker compose restartwill not update containers after pulling, onlyupwill work for that.
If you want to set it up in an existing docker-compose file instead of a new
dedicated one, simply adjust the volumes section to mount a subdirectory
instead of the current directory as the data directory:
volumes:
- ./mautrix-$bridge:/data
When you put the bridge and Synapse in the same docker-compose file, networking
should work out of the box, which means you don't need any of the commented
ports or networks things in the example compose file.
Kubernetes
Kubernetes setups aren't officially supported. However, there are some things you should note if you want to run the bridges in k8s or similar systems:
- You can bypass the startup script and just run the main bridge command
directly to avoid permission mangling, automatic registration generation,
and other such things. The bridge also doesn't need the registration file at
all when doing this, only the config file is needed.
- You can also add
--no-updateto the command to tell the bridge to not try to write the config to disk. When preventing writing the config, make sure you don't leave anygeneratevalues in the config, as otherwise they'll be randomized on every startup and will cause unexpected behavior. - When bypassing the startup script and using
--no-update, the config file (and entire/datadirectory) can be read-only. Keep in mind that preventing the bridge writing means you sometimes have to manually update the config.
- You can also add
- A
StatefulSetis likely the best way to run the bridge, because only one container can be running at a time. Multiple containers even briefly are extremely unsupported and may cause your server to explode. - You should set
publishNotReadyAddresses: true. The bridges will check homeserver -> bridge connectivity on startup, which may fail or be delayed if k8s delays publishing the bridge address. There is also no reason to not publish addresses ASAP, because you can only have one instance of the bridge running at a time. - Liveness and readiness endpoints are available at
/_matrix/mau/liveand/_matrix/mau/readyrespectively, but they aren't particularly useful due to the points mentioned above.
Contributing guidelines
These guidelines apply to all mautrix bridges, as well as other associated projects like the mautrix libraries, meowlnir, and gomuks.
Making pull requests
For any non-trivial changes (more than a few lines), you should join the Matrix room linked in the project readme and briefly explain your plan to confirm that it makes sense and is wanted. Failure to do so may result the PRs in being ignored and/or closed without further comment. The Matrix room is also preferred in case discussion about the contribution beyond basic code review is necessary.
Updating the changelog file is not necessary when making a pull request. That will be done separately when a release is being made.
Pull requests may be missed and/or forgotten for extended periods of time, especially if they involve more complicated changes. Feel free to remind us in the appropriate Matrix room if it seems like nothing is happening. Pinging on GitHub is not recommended.
In case a PR has too many things to fix, it may be rewritten instead of reviewed. If that is something which would offend you, please don't open a PR.
Development instructions
The latest version of Go is recommended, but using the previous version is fine too. Go only supports the last two releases, so anything older than that is EOL and will not work.
Since the bridges use cgo, you'll also need a C compiler and libolm-dev installed
(though libolm-dev can be bypassed by using -tags goolm). For Signal, you can
either install Rust, or just download libsignal_ffi.a from the CI to avoid the
Rust dependency (see normal Signal setup instructions for that).
You should install pre-commit and run pre-commit install in the repo before
committing to have linters run automatically. You can also run pre-commit run -a
before pushing to lint everything. Finally, you can let GitHub actions run the
linters for you after pushing, but it's usually more effort to go back and fix
things at that point.
Using Linux or macOS is recommended for development. Windows is generally not a supported environment for anything, so WSL is likely necessary if you're running Windows.
A local Synapse instance is useful for testing bridges. Alternatively, you can
sign up for Beeper and use bridge-manager to run local bridges against the
Beeper servers (there's a convenient --local-dev flag for bbctl run).
Code style
See https://beeper.notion.site/Beeper-Go-Guidelines-ae943532d96f4ad6a614baf836c073eb
Use of AI
In general, you can use AI to help with contributions. However, you must understand all the changes that were made. If you submit PRs that are full of nonsense, they will be closed immediately. All PRs are held to the same (relatively high) standards for code quality, architecture, etc regardless of whether AI is used.
PR authors are expected to test their changes (if applicable). Understanding changes generally means testing it yourself, not asking AI to do it.
Avoid using AI for generating pull request descriptions. AI-generated descriptions are long and usually have very little useful information.
Python bridge setup
Please select a bridge above. If you don't select a bridge, you'll have to
manually replace occurrences of $bridge with the correct name before running
commands. The selector requires JavaScript to replace text.
This page contains instructions for setting up the bridge in a virtualenv. You may also want to look at other ways to run the bridge:
- Docker
- systemd service (at the bottom of this page)
Please note that everything in these docs are meant for server admins who want to self-host the bridge. If you're just looking to use the bridges, check out Beeper, which provides fully managed instances of all of these bridges.
If you need help with setting up the bridge, you can ask in the Matrix room: #$bridge:maunium.net. For help with setting up other parts like the homeserver that aren't the bridge, refer to their documentation to find support rooms.
Requirements
- Python 3.10 or higher with
pipandvirtualenv. - A Matrix homeserver that supports application services (e.g. Synapse). You need access to register an appservice, which usually involves editing the homeserver config file.
- A PostgreSQL server, v10 or higher (which you should already have for Synapse).
- Make sure you don't share databases between unrelated programs. Shared postgres instance is fine, but shared database is not.
- If installing optional dependencies, see the optional dependencies page.
Production setup
Don't use sudo for any of these steps (and preferably don't use the root user either).
- Create a directory for the bridge. Do not clone the repository.
- Set up a virtual environment.
- Create with
virtualenv -p /usr/bin/python3 .(note the dot at the end)- You should not use a subdirectory for the virtualenv in this production
setup. The
pip installstep places some required files at the root of the environment.
- You should not use a subdirectory for the virtualenv in this production
setup. The
- Activate with
source ./bin/activate
- Create with
- Install the bridge with
pip install --upgrade mautrix-$bridge[all][all]at the end will install all optional dependencies. This includes end-to-bridge encryption, which requires libolm3. See the optional dependencies page for more info.- If you want the master branch instead of a release, use
pip install --upgrade mautrix-$bridge[all]@git+https://github.com/mautrix/$bridge.git.
- Copy
example-config.yamltoconfig.yaml. - Update the config to your liking. See the initial bridge config page for recommendations.
- Generate the appservice registration with
python -m mautrix_$bridge -g. You can use the-cand-rflags to change the location of the config and registration files. They default toconfig.yamlandregistration.yamlrespectively. - Register the bridge on your homeserver (see Registering appservices).
- Run the bridge
python -m mautrix_$bridge. - After the bridge is running, refer to the bridge-specific Authentication page to start using it.
Upgrading (production setup)
- Make sure you're in the virtualenv (
source ./bin/activate).- Note: if you updated Python, you'll have to recreate the virtualenv to apply the update.
- Run the bridge install command again (install step #2).
Development setup
- Clone the repository.
- Optional, but strongly recommended: Set up a virtual environment.
- Create with
virtualenv -p /usr/bin/python3 .venv - Activate with
source .venv/bin/activate
- Create with
- Install dependencies with
pip install --upgrade -r requirements.txt- Optionally, add
-r optional-requirements.txtto install optional dependencies. Some of the optional dependencies may need additional native packages. See the optional dependencies page for more info.
- Optionally, add
- Continue from step #3 of production setup.
- For linting:
pip install -r dev-requirements.txtto install Black, isort and pre-commit, then install the Git hook withpre-commit install. This will ensure that code is properly formatted when you commit, to avoid having to fix linting errors when the CI complains.
Upgrading (development setup)
- Make sure you're in the virtualenv (
source .venv/bin/activate).- Note: if you updated Python, you'll have to recreate the virtualenv to apply the update.
- Pull changes from Git.
- Run the dependency install command again (install step #2).
systemd service
- Create a user for the bridge:
$ sudo adduser --system mautrix-$bridge --home /opt/mautrix-$bridge - Follow the production setup instructions above. Make sure you use that user and home directory for the bridge.
- Create a systemd service file at
/etc/systemd/system/mautrix-$bridge.service:[Unit] Description=mautrix-$bridge bridge [Service] # N.B. If you didn't create a user with the correct home directory, set this # to the directory where config.yaml is (e.g. /opt/mautrix-$bridge). WorkingDirectory=~ ExecStart=/opt/mautrix-$bridge/bin/python -m mautrix_$bridge User=mautrix-$bridge [Install] WantedBy=multi-user.target
Optional dependencies
Usage
Production setup
The pip install URLs in the production setup guide include [all] at the end
by default, which means all optional dependencies will be installed by default.
If you only want specific optional dependencies, replace the all with a
comma-separated list of the pip extra names (e.g. sqlite,speedups).
If you don't want any optional dependencies, just remove the [all].
Development setup
To install all optional dependencies, use pip install --upgrade -r optional-requirements.txt.
To install specific optional dependencies, install the packages listed
"Required packages" from the table of optional dependencies below. You can also
check the expected versions of the packages from optional-requirements.txt.
Docker
The docker images contain all optional dependencies. Currently they can't be easily disabled.
List of optional dependencies
The † symbol means you must also enable the feature in the config. Required
packages in parentheses indicate a large dependency of the other packages.
All Python bridges
| pip extra name | Required packages | Description |
|---|---|---|
†metrics | prometheus_client | Prometheus metrics. |
†e2be | python-olm pycryptodome unpaddedbase64 | End-to-bridge encryption support (see native dependency below). |
†sqlite | aiosqlite | Experimental SQLite support (currently in Telegram/Facebook/Signal) |
N.B. python-olm requires libolm3 with dev headers, Python dev headers, and
a C compiler. This means libolm-dev, python3-dev and build-essential on
Debian-based distros.
If you want to avoid the dev headers, you can install the libolm3 package without -dev and get a pre-compiled python-olm from gitlab.matrix.org's PyPI registry. However, this method has not been tested properly, so it might not work at all.
pip install python-olm --extra-index-url https://gitlab.matrix.org/api/v4/projects/27/packages/pypi/simple
mautrix-telegram
| pip extra name | Required packages | Description |
|---|---|---|
speedups | cryptg cchardet aiodns brotli | Speed up some things, e.g. by using native crypto code. |
qr_login | qrcode Pillow | Telegram login by scanning a QR code from another device. |
formattednumbers | phonenumbers | Format phone numbers nicely in contact share messages |
Manhole
The "manhole" allows server administrators to access a Python shell on a running bridge. This is a very powerful mechanism for administration and debugging.
To enable it, update the config and restart the bridge: set manhole ->
enabled to true and manhole -> whitelist to the list of system UIDs you
want to allow connecting. After that, send open-manhole <uid> to the bridge
bot on Matrix as a bridge admin user to open the manhole for the given UID.
When the manhole is open, you can open a connection with nc -NU /var/tmp/mautrix-telegram.manhole in your normal shell. Optionally, install
rlwrap and use rlwrap nc instead of nc to get a nicer prompt. To use
rlwrap with Docker, run it on the host: rlwrap docker exec -i nc -NU /var/tmp/mautrix-telegram.manhole. Alternatively, you can mount the socket to
the host and connect with the hosts netcat and rlwrap.
To close the connection, use Ctrl+C or exit(). To close
the manhole, use the close-manhole management command or use manhole.close()
inside the manhole.
Inside the manhole, bridge refers to the main class instance. Refer to the
source code to see how everything works. The manhole supports top-level await
expressions similar to python -m asyncio.
mautrix-googlechat
Welcome to the mautrix-googlechat docs!
Use the sidebar to find the relevant pages. Things that are the same for all bridges, like setting up the bridge, are right below the "Python-based bridges" header. Things specific to mautrix-googlechat are under this page.
These docs are mostly targeted towards people who are hosting the bridge themselves. If you don't want to host it yourself, you can use a public instance. When using public instances, refer to their instructions and support rooms.
If you run a public instance and wish to list it here, please make a pull request.
Discussion
Matrix room: #googlechat:maunium.net
Authentication
- Open a private chat with the bridge bot. Usually
@googlechatbot:your.server.- If the bot doesn't accept the invite, see the troubleshooting page
- Open https://chat.google.com in a private browser window and log in
normally, then extract cookies:
- Press F12 to open developer tools.
- select the "Application" (Chrome) or "Storage" (Firefox) tab.
- In the sidebar, expand "Cookies" and select
https://chat.google.com. - In the cookie list, find the
COMPASS,SSID,SID,OSIDandHSIDrows.- When using Firefox, you may have multiple
COMPASScookies with different paths. Pick the one where path is/.
- When using Firefox, you may have multiple
- Form a JSON object with the extracted cookies. It should look something
like this (field names are case-insensitive):
{ "compass": "dynamite-ui=...", "ssid": "...", "sid": "...", "osid": "...", "hsid": "..." } - Close the browser window to prevent the cookies being invalidated (Google uses refresh tokens, so you need to close the window within a few minutes).
- Send
login-cookie {the json object}to the bot. - Recent chats should now get portals automatically. Other chats will get portals as you receive messages.
Note that you can't use a browser with Device Bound Session Credentials enabled. Firefox hasn't implemented that at all and should work, Chrome also allows disabling the feature via flags. Once the bridge is rewritten to use the bridgev2 architecture, mautrix-manager will also work.
Go bridge setup
Please select a bridge above. If you don't select a bridge, you'll have to
manually replace occurrences of $bridge with the correct name before running
commands. The selector requires JavaScript to replace text.
This page contains instructions for setting up the bridge by running the executable yourself. You may also want to look at the other ways to run the bridge:
- Docker
- YunoHost: mautrix_whatsapp_ynh
- systemd service (at the bottom of this page)
Please note that everything in these docs are meant for server admins who want to self-host the bridge. If you're just looking to use the bridges, check out Beeper, which provides fully managed instances of all of these bridges.
If you need help with setting up the bridge, you can ask in the Matrix room: #$bridge:maunium.net. For help with setting up other parts like the homeserver that aren't the bridge, refer to their documentation to find support rooms.
Step 0: Requirements
- A Matrix homeserver that supports application services (e.g. Synapse). You need access to register an appservice, which usually involves editing the homeserver config file.
- A PostgreSQL server, v16 or higher (which you should already have for Synapse).
- Make sure you don't share databases between unrelated programs. Shared postgres instance is fine, but shared database is not.
- mautrix-whatsapp: A WhatsApp client running on a phone (both physical and virtual phones work).
- mautrix-signal: A Signal client that can add linked devices (both official mobile apps and some unofficial clients like signal-cli work).
- ffmpeg for converting things like voice messages and gifs (whether it's actually required depends on the bridge).
- mautrix-{discord,telegram,whatsapp}: LottieConverter (and ffmpeg) if you want to receive animated stickers.
- mautrix-gvoice:
Sending messages with non-workspace accounts requires having Electron installed,
such that the bridge can run the
electronbinary in headless mode.
If you want to compile the bridge manually (which is not required), you'll also need:
- Go 1.25+ (download & installation instructions at https://go.dev/doc/install).
- libolm3 with dev headers and a C/C++ compiler (if you want end-to-bridge encryption).
- mautrix-signal: Rust, Cargo, libclang-dev and protoc+libprotobuf-dev (if you want to compile libsignal yourself).
Step 1: Installation
You may either compile the bridge manually or download a prebuilt executable from the mau.dev CI or GitHub releases. Prebuilt executables are the simplest option, as they don't require having Go nor libolm installed.
Option 1: Downloading a prebuilt executable from CI
- Download the relevant artifacts:
- linux/amd64: https://mau.dev/mautrix/$bridge/-/jobs/artifacts/main/download?job=build%20amd64
- linux/arm64: https://mau.dev/mautrix/$bridge/-/jobs/artifacts/main/download?job=build%20arm64
- linux/arm: https://mau.dev/mautrix/$bridge/-/jobs/artifacts/main/download?job=build%20arm
- or find it yourself on https://mau.dev/mautrix/$bridge/-/pipelines?ref=main
- Extract the downloaded zip file into a new directory.
Option 2: Downloading a release
- Go to https://github.com/mautrix/$bridge/releases
- Download the binary for the architecture you want and save it in a new directory.
Option 3: Compiling manually
- Clone the repo with
git clone https://github.com/mautrix/$bridge.git mautrix-$bridge - Enter the directory (
cd mautrix-$bridge) - Run
./build.shto fetch Go dependencies and compile (build.shwill simply callgo buildwith some additional flags).- If you want end-to-bridge encryption, make sure you have a C/C++ compiler
and the Olm dev headers (
libolm-devon debian-based distros) installed. - If not, use
./build.sh -tags nocryptoto disable encryption.- Note: signal's build.sh script doesn't support extra arguments yet, so you have to use build-go.sh manually after building libsignal-ffi.a.
- As an experimental feature, you can also use
-tags goolmto use a pure Go reimplementation of libolm. Encryption can be supported without a C compiler or Olm dev headers with this method.
- If you want end-to-bridge encryption, make sure you have a C/C++ compiler
and the Olm dev headers (
For mautrix-signal, if you don't want to compile libsignal yourself, you can
download a precompiled libsignal_ffi.a from the mau.dev CI and place it in
/usr/local/lib (or some other directory set in LIBRARY_PATH). Download links:
Linux amd64,
Linux arm64,
macOS arm64
Step 2: Configuring and running
- Use
./mautrix-$bridge -eto generate an example config and save it toconfig.yaml.- Alternatively, you can find pregenerated examples at https://docs.mau.fi/configs/mautrix-$bridge/latest (remember to choose the appropriate version at the top if you're not using latest).
- Discord is still using the legacy architecture which doesn't have the
-eflag, so just manually copyexample-config.yamlfrom the repo toconfig.yaml.
- Update the config to your liking. See the initial bridge config page for recommendations.
- Generate the appservice registration file by running
./mautrix-$bridge -g.- You can use the
-cand-rflags to change the location of the config and registration files. They default toconfig.yamlandregistration.yamlrespectively.
- You can use the
- Register the bridge on your homeserver (see Registering appservices).
- Run the bridge with
./mautrix-$bridge. - After the bridge is running, refer to the bridge-specific Authentication page to start using it.
Updating
If you compiled manually, pull changes with git pull and recompile with
./build.sh.
If you downloaded a prebuilt executable, simply download a new one and replace the old one.
Finally, start the bridge again.
systemd service
- Create a user for the bridge:
$ sudo adduser --system mautrix-$bridge --home /opt/mautrix-$bridge - Follow the normal setup instructions above. Make sure you use that user and home directory for the bridge.
- Create a systemd service file at
/etc/systemd/system/mautrix-$bridge.service:[Unit] Description=mautrix-$bridge bridge [Service] Type=exec User=mautrix-$bridge WorkingDirectory=/opt/mautrix-$bridge ExecStart=/opt/mautrix-$bridge/mautrix-$bridge Restart=on-failure RestartSec=30s # Optional hardening to improve security ReadWritePaths=/opt/mautrix-$bridge NoNewPrivileges=yes # This may cause issues with libsignal. # Should be safe for other bridges #MemoryDenyWriteExecute=true PrivateDevices=yes PrivateTmp=yes ProtectHome=yes ProtectSystem=strict ProtectControlGroups=true RestrictSUIDSGID=true RestrictRealtime=true LockPersonality=true ProtectKernelLogs=true ProtectKernelTunables=true ProtectHostname=true ProtectKernelModules=true PrivateUsers=true ProtectClock=true SystemCallArchitectures=native SystemCallErrorNumber=EPERM SystemCallFilter=@system-service [Install] WantedBy=multi-user.target
mautrix-telegram
Welcome to the mautrix-telegram docs!
Use the sidebar to find the relevant pages. Things that are the same for all bridges, like setting up the bridge, are right below the "Go-based bridges" header. Things specific to mautrix-telegram are under this page.
These docs are mostly targeted towards people who are hosting the bridge themselves. If you don't want to host it yourself, you can use a public instance. When using public instances, refer to their instructions and support rooms.
- beeper.com (only puppeting, no relaybot)
- t2bot.io / #help:t2bot.io (only relay bridging, puppeting is disabled, legacy Python bridge)
- tchncs.de / #tchncs:tchncs.de (legacy Python bridge)
If you run a public instance and wish to list it here, please make a pull request.
Discussion
Matrix room: #telegram:maunium.net
Telegram chat: t.me/mautrix_telegram (bridged to Matrix room)
Authentication
- Open a private chat with the bridge bot. Usually
@telegrambot:your.server- If the bot doesn't accept the invite, see the troubleshooting page
User login
N.B. While the bridge uses the official client API, Telegram is known to ban suspicious users, and a brand new account using a 3rd party client is considered suspicious. Using a well-established account is perfectly safe. If you do get banned, Telegram usually reverts incorrect bans fairly quickly after emailing recover@telegram.org.
With 6-digit code
- Send
login phone <your phone number>to the bot where<your phone number>is in international format (+123456789). - Telegram will send you a 6-digit code to another Telegram client, which the
bot will prompt you to send to the room.
- Note: Telegram will not send the code over SMS. You need to have an official Telegram client already logged in to log into the bridge.
- If you have a 2FA password, the bot will prompt you to send it to the room.
With QR code
- Go to Settings -> Devices in the Telegram app on your phone and tap "Link Desktop Device".
- Send
login qrto the bot. - Scan the QR code with your phone.
- If you have a 2FA password, the bot will prompt you to send it to the room.
Finally: If all went well, the bot should inform you of a successful login, and depending on the backfill and chat sync settings, the bridge should start creating portal rooms for all your Telegram chats and invite you to them.
Bot login
You can log into the bridge with a bot token for relaying, or if you just don't want to use your real account with the bridge. Note that bots are more limited, e.g. chats will only sync after receiving a message.
Also keep in mind that for relay mode, you should use a dedicated Matrix account, not your main one, as explained in the relay mode docs.
- Send
login bot <your bot token>to the bot where<your bot token>looks like123456789:AABlmfCv0WOyqCxS15ACfvfBUZIqUWjLvM.
Registering
Telegram officially discontinued registration from 3rd party clients as of 2023-02-18, so support for it was removed in v0.13.0 of the bridge. You should sign up using a mobile client and then log into the bridge.
You can safely uninstall the mobile client after the bridge is logged in. Telegram is not encrypted, so they don't have a concept of a primary device like WhatsApp and Signal do.
mautrix-whatsapp
Welcome to the mautrix-whatsapp docs!
Use the sidebar to find the relevant pages. Things that are the same for all bridges, like setting up the bridge, are right below the "Go-based bridges" header. Things specific to mautrix-whatsapp are under this page.
These docs are mostly targeted towards people who are hosting the bridge themselves. If you don't want to host it yourself, you can use a public instance. When using public instances, refer to their instructions and support rooms.
If you run a public instance and wish to list it here, please make a pull request.
Discussion
Matrix room: #whatsapp:maunium.net
In case you need to upload your logs somewhere, be aware that they contain your
contacts' and your phone numbers. Strip them out with | sed -r 's/[0-9]{10,}/📞/g'
Android VM setup (not recommended)
This page documents how to setup WhatsApp in an Android Virtual Machine. It could be useful if you cannot or don't want to run WhatsApp on a mobile phone.
Running in a virtual machine is more suspicious and increases the risk of getting banned. A physical phone is recommended.
Requirements
You'll need a working Android SDK. You can use the Android Studio suite or only the command-line tools.
Currently the Android SDK appears to only work with OpenJDK8 (not 11), which will need to be installed.
WhatsApp in the Android VM will need to scan a QR-code via webcam. We can do this by passing the emulator a real webcam (which needs to be able to see the emulator screen) or a virtual one (e.g. v4l2loopback).
Android Virtual Device
Let's create an AVD (Android Virtual Device), get its webcam working and install WhatsApp.
Create the AVD
WhatsApp currently requires Android 2.3.3 (API 10) or newer. If you wish to install WhatsApp through the play store, choose a System Image supporting Google APIs.
The AVD will be created in ~/.android/avd/, regardless of the method you use
to create it.
Using Android Studio
Android Studio offers an AVD Manager interface to create, configure and run AVDs.
Via command line
It's also possible to create an emulated android device from command line, using avdmanager from the Android SDK:
Install the required SDK components
Change the version and architecture as required. If your host has KVM support you should use the x86 target. If you don't have KVM support (running in certain VPS systems) then you will need to use the ARM targets.
./tools/bin/sdkmanager --install platform-tools emulator
./tools/bin/sdkmanager --install "platforms;android-24"
./tools/bin/sdkmanager --install "system-images;android-24;default;armeabi-v7a"
Once you have the SDK setup you can create a VM.
./tools/bin/avdmanager create avd -n AVD_NAME -k SDK_ID
e.g.:
./tools/bin/avdmanager create avd -n MyWhatsAppVM -k "system-images;android-24;default;armeabi-v7a"
or when using KVM (includes Play Store):
./tools/bin/avdmanager create avd -n MyWhatsAppVM -k "system-images;android-28;google_apis_playstore;x86"
Run the AVD using the Android Emulator:
./emulator/emulator -show-kernel -no-boot-anim -avd AVD_NAME
Set up the webcam
Android Emulator seems to support different ways to feed custom images/videos to
the Android Webcam, but somehow the only one that worked for me is passing it
the host's camera (i.e. using webcam0 camera mode).
webcam0 seems to always be connected to the device /dev/video0. In case you
wish to use a different device (e.g. /dev/video2), rename it to /dev/video0:
# needed if you want to feed /dev/video2 to the AVD
sudo mv /dev/video0 /dev/video0.original
sudo mv /dev/video2 /dev/video0
Set the back-camera mode to webcam0, either using the AVD Manager GUI (enable
Show Advanced Settings) or by running the emulator from command line:
./emulator/emulator -avd AVD_NAME -camera-back webcam0
Use v4l2loopback to create a virtual camera
Install the v4l2loopback module and load it:
modprobe v4l2loopback
This should create a new /dev/video* file. If needed, rename it as /dev/video0.
Feed your desktop into this virtual webcam, e.g. using:
ffmpeg -f x11grab -s 640x480 -i :0.0+10,20 -vf format=pix_fmts=yuv420p -f v4l2 /dev/video0
You can test whether it's working by watching your webcam
(e.g. with mplayer tv:// -tv driver=v4l2:device=/dev/video0).
The AVD's webcam should now show a piece of your desktop. When mautrix-whatsapp (or WhatsApp Web) shows you the QR-code, just move its window onto the shared desktop area.
Boot the AVD
You can boot the AVD using the AVD Manager GUI, or calling the emulator via command line:
./emulator/emulator -avd AVD_NAME [options]
Some useful options include:
-no-audioand-no-window, to disable audio and video for the VM. With these the emulator can run headless.-show-kernel, display the console boot text instead of showing the boot GUI-no-snapshot, to cold boot the AVD (i.e. it will ignore some cache).-memory MB, to reduce the amount of RAM passed to the AVD. Unfortunately the emulator will force a minimum amount.
Install WhatsApp
WhatsApp will only work with your phone number on a device per time: when you log in on your AVD, the other devices will disconnect. If you install WhatsApp on an AVD and copy such AVD, both copies will be able to run WhatsApp (although not at the same time!)
WhatsApp can be installed using Google Play, if available, or with an APK. In
the latter case, just drag'n'drop the APK on the emulator's window or run
adb install APK_FILE.
In the 'Chats screen' goto 'Menu' > 'WhatsApp Web'. You can follow the instructions and use WhatsApp Web to verify whether all is working.
You can now proceed to link your virtual android to the bridge as described on the authentication Page.
NOTE: The bridge will cycle through multiple QR codes, you have to have everything ready to go. You won't have time to copy/paste images so you will need the VM and the Matrix client running on the same desktop.
After installation has finished ensure you open Android settings -> "Battery" -> "All Apps" -> find WhatsApp and choose: "Do not optimize".
Running Headless
Once everything is working, you can run the Android emulator headless, and even copy it to a server or whatever.
Make sure that all the software we need (Android SDK, Emulator, system images etc) is installed on the target host.
Copy your AVD over there (from ~/.android/avd/AVD_NAME.* on your system to the
~/.android/avd/ of the target host).
Run the emulator headless:
./emulator/emulator -avd AVD_NAME -no-audio -no-window [options]
If your AVD goes into sleep-mode or becomes unresponsive, you can try to reboot
it or to start WhatsApp main activity running
am start -n 'com.whatsapp/.HomeActivity' on your AVD
(or e.g. adb [-s DEVICE_SERIAL] shell am start -n 'com.whatsapp/.HomeActivity'
directly on your shell).
Required packages
Here a list of the packages you'll need to install on various Linux distributions to make everything work.
Arch Linux
Either install android-studioAUR or:
- android-tools
- android-sdkAUR
- android-emulatorAUR
- android-x86-system-image-XXAUR (replace
XXwith the system image you wish to use)
You might want to choose jdk8-openjdk as java-environment, as newer JDKs
seem to have problems with the Android stuff.
Note that android-studio and the other packages aren't fully compatible: the
system image path will differ slightly and you'll need to fix it in the AVD
config.ini files: image.sysdir.1 should be something like
system-images/android-15/default/x86/ for Android Studio images, and
system-images/android-15/x86/ for AUR system images. The emulator will
otherwise fail printing Cannot find AVD system path. Please define ANDROID_SDK_ROOT.
Install v4l2loopback-dkms-gitAUR to use v4l2loopback.
Authentication
- Open a private chat with the bridge bot. Usually
@whatsappbot:your.server- If the bot doesn't accept the invite, see the troubleshooting page
- Send
login qrto start the login.- To log in by entering a 8-letter code on your phone instead of scanning
the QR code, use
login phoneinstead and send your phone number when prompted.
- To log in by entering a 8-letter code on your phone instead of scanning
the QR code, use
- Log in by scanning the QR code or entering the pairing code. If the code
expires before you scan it, the bridge will send an error to notify you.
- Open WhatsApp on your phone.
- Tap Menu
 or
Settings
or
Settings  and select Linked devices.
 - Point your phone at the image sent by the bot to capture the code.
- If logging in with pairing code, tap "Link with a phone number instead".
- For some users, WhatsApp may require additional verification using a passkey.
You can either follow the bot's instructions using browser devtools, or
alternatively use mautrix-manager.
- Note that on Linux, only Chrome-based browsers support generating QR codes to use a passkey from another device. Firefox only supports local passkeys.
- Finally, the bot should inform you of a successful login.
- The bridge will start creating portal rooms approximately a minute after login. The amount of backfill can be configured before login, the default is to create portals for all chats from WhatsApp and backfill 50 messages in recent chats.
Please note that the bridge uses the web API. If the phone is offline for >2 weeks, linked devices will become disconnected: https://faq.whatsapp.com/general/download-and-installation/about-linked-devices. The bridge will warn you if it doesn't receive any data from the phone in over 12 days.
N.B. WhatsApp is known to ban accounts that are too suspicious. Just using the bridge shouldn't cause any bans, but getting banned is more likely when combining the bridge with other suspicious activity (running WhatsApp in an Android emulator, using VoIP numbers, using a newly created account, initiating DMs to non-contacts, etc).
Logging out
Simply run the logout management command.
mautrix-discord
Welcome to the mautrix-discord docs!
Use the sidebar to find the relevant pages. Things that are the same for all bridges, like setting up the bridge, are right below the "Go-based bridges" header. Things specific to mautrix-discord are under this page.
These docs are mostly targeted towards people who are hosting the bridge themselves. If you don't want to host it yourself, you can use a public instance. When using public instances, refer to their instructions and support rooms.
If you run a public instance and wish to list it here, please make a pull request.
Discussion
Matrix room: #discord:maunium.net
Authentication
- Open a private chat with the bridge bot. Usually
@discordbot:your.server- If the bot doesn't accept the invite, see the troubleshooting page
- Follow one of the three instructions below.
N.B. Discord may ban users who are too suspicious. The bridge shouldn't be too suspicious by default, but if you want to avoid any risk, use a bot account.
QR login
QR login is more convenient, but requires having the Discord mobile app installed, and may encounter CAPTCHAs which are currently not supported by the bridge.
- Send
login-qrto start the login. - Log in by scanning the QR code with a Discord mobile app.
- After scanning the code, you'll need to approve the login on the mobile app. See the official docs for more info.
- The app can be uninstalled afterwards.
- If you encounter a bad request error saying something about a captcha, you'll have to use token login. Otherwise the login should be successful.
Token login
You can also log in by logging in manually and providing the access token to the bridge.
- Log in to Discord in a browser. A private window is recommended so you can easily make the browser forget the token without invalidating it.
- Press F12 (or Cmd+Shift+I on Mac) to open developer tools.
- Select the "Network" tab and filter for
api. - Press F5 (or Cmd+R on Mac) to reload the page.
- Pick any successful request (e.g. the
libraryrequest). Scroll down to "Request Headers" and find theAuthorizationheader. Right-click the entry and choose copy value. - Send
login-token user <token>to the bot (replacing<token>with the copied value). - (Close the private window)
Bot token login
If you don't want to use a real account, you can also log in as a bot.
- Create an application on https://discord.com/developers/applications.
- In the "Bot" section, add a bot and copy the token.
- Enable "server members intent" and "message content intent" under the "Privileged Gateway Intents" section.
- Send
login-token bot <token> - To add your bot to a guild, go to OAuth2 -> URL Generator, select "bot"
under scopes and select the permissions to grant. The generated URL can then
be used to add the bot to a guild.
- At least "Send Messages", "Create Public Threads", "Send Messages in
Threads", "Read Message History" and "Add Reactions" are recommended.
"Manage Webhooks" is also useful if you want to use the
!discord set-relay --createcommand. - If you're the guild admin, you can just choose "Administrator" for the bot and not worry about exact permissions.
- N.B. Don't select any scopes other than
bot, otherwise it will require you to specify a redirect URI. As long asbotis the only scope, a redirect URI is not required.
- At least "Send Messages", "Create Public Threads", "Send Messages in
Threads", "Read Message History" and "Add Reactions" are recommended.
"Manage Webhooks" is also useful if you want to use the
After a successful login, the bridge will create portals for some recent DMs
(some is defined by startup_private_channel_create_limit in the bridge config).
Messages can also be backfilled, but that is disabled by default (the limit is 0).
To bridge guilds, use the guilds command.
Bridging rooms
By default, the bridge will create portals for a few recent direct messages
after logging in. The startup_private_channel_create_limit option in the
config defines the number of chats. More DMs are bridged as you receive messages
in them.
Entire guilds can be bridged using the guilds command. Use guilds status to
view the list of guilds and get their IDs, then use guilds bridge <id> to
bridge a guild. After bridging, spaces will be created automatically, and rooms
will be created as necessary when messages come in. You can also pass --entire
to the bridge command to immediately create all rooms.
If you want to manually bridge channels, invite the bot to the room you want to
bridge and run !discord bridge <channel ID> to bridge the room. After that,
you can also use !discord set-relay to set up relaying with webhooks.
Relaying with webhooks
New in version 0.2.0
The bridge supports using Discord's webhook feature to relay messages from Matrix users who haven't logged into the bridge.
Even when using webhooks to relay messages from non-logged-in users, there must still be at least one user who is logged into the bridge somehow, either with a bot or a real user account. The bridge itself is never logged in, there's no special "bridge bot" account on Discord. Webhooks can be used regardless of which type of login you use, a bot is not required. However, in the future the bridge may include additional relay integration using a bot.
If you want to use the bridge for relaying only and don't want to log in with your real Discord account, it is recommended to have a dedicated Matrix account to log in as the bot user. This is the closest way to emulate the experience of having a special "bridge bot" on Discord. If you log in on your main Matrix account, your messages will be sent through the bot rather than through the webhook with custom profiles.
Setup
To enable relaying in a room, use !discord set-relay. The command requires a
parameter, which can either be --create [name] or --url <url>.
The room must be bridged before running set-relay. You can either have the
bridge create rooms by bridging the entire guild with the guilds command, or
you can bridge individual channels using the bridge command. See the bridging
rooms page for more info.
!discord set-relay --createwill create a new webhook. You must be logged into the bridge as a user or bot that has privileges to create webhooks in on the Discord side.- You can optionally pass a name for the webhook after the command,
e.g.
!discord set-relay --create matrix bridge. The default name is "mautrix". Note that the name may not contain "discord".
- You can optionally pass a name for the webhook after the command,
e.g.
!discord set-relay --url https://discord.com/api/webhooks/...will use the given webhook URL for relaying.- You can optionally specify a room ID before
--urlto run the command in a private room (and avoid leaking the webhook secret to everyone else in the room being bridged), e.g.!discord set-relay !26DmcJd3cQ...:example.com --url https://discord.com/...
- You can optionally specify a room ID before
To get avatars to show up, you must set the public_address field in the
bridge section to a public https address that Discord can use to reach the
bridge (the same server as defined in the appservice section). Discord will
use the /mautrix-discord/avatar/{server}/{id}/{hash} endpoint on the provided
address to download avatars.
In-depth explanation of bridging modes
The bridge has two ways of bridging messages to Discord:
- Messages from users who have logged in (i.e. ran the
logincommand successfully) will be bridged through the account they logged in with. It makes no difference whether the account is a bot or a real user.- Bots and users can't change their profile info per message on Discord. They always use the profile set for the bot or user.
- Messages from users who have not logged in will be bridged through the webhook
set for the portal, if there is one. If not, those messages will not be
bridged at all.
- Webhooks can change their profile info per message on Discord, so the bridge will send the Matrix user's profile info for each message.
If you run login bot <bot token> using your main Matrix account, then your
messages will be bridged through the bot (with the bot's default name/avatar),
not through the webhook with a custom name/avatar. Therefore, if you want your
messages to be bridged through the webhook, don't run the command on your main
account. Instead, you should make a separate Matrix account just for logging
into the bridge as the Discord bot.
The bridge has no special features when logging in with a bot token. If one or more users log in with their real Discord accounts, there is no benefit to having a bot too. A webhook is sufficient for bridging messages from Matrix users who haven't logged in.
Direct media access (v2)
New in version 0.7.0
To avoid spamming your homeserver's media repository with all files from
Discord, the bridge has an option to generate fake mxc:// URIs that contain
the Discord message ID and some other info. To make the URIs work, the bridge
effectively turns into a media-only homeserver.
For example, if your main Matrix server is example.com, you could set up
discord-media.example.com as the bridge's server name. The way to do that
is to either proxy the subdomain to the bridge entirely, or create a
.well-known/matrix/server file (just like normal homeserver setups) pointing
somewhere else where the bridge is listening.
When proxying the subdomain entirely, port 443 is enough, the bridge will automatically serve a .well-known to redirect from port 8448 to 443.
Endpoints that the bridge can handle with direct media access:
/_matrix/federation/v1/media/download/*/_matrix/client/v1/media/*/_matrix/media/*(legacy, pre-MSC3916)/_matrix/key/*/_matrix/federation/v1/version/.well-known/matrix/server
To enable direct media access:
- Set
bridge->direct_media->enabledtotrue. - Change the
server_namefield to a (sub)domain where the aforementioned endpoints are proxied to the bridge. - Ensure
server_keyis set.- The bridge generates one automatically on startup and writes it back to the config. If you prevented the bridge from writing the config, you'll have to set it yourself so it wouldn't generate a new one on every restart.
Legacy direct media access
In the past, the bridge supported specifying templates that a simple reverse proxy could parse to redirect the request to Discord's CDN. However, that method no longer works since Discord started requiring signed URLs that expire.
Old docs
New in version 0.4.0
To avoid spamming your homeserver's media repository with all files from
Discord, the bridge has an option to generate fake mxc:// URIs that contain
the Discord media ID. The media repo or your reverse proxy can then handle
those URIs specially to fetch content directly from the Discord CDN.
To enable this mode, set bridge -> media_patterns -> enabled to true
in the bridge config. You can then configure each of the patterns or leave the
defaults.
Ways to use patterns
Default pattern and MSC3860-compatible media repo
If your media repo supports MSC3860, you can use the default patterns out of the box with no modifications. Your media repo will act like discord-media.mau.dev is a federated Matrix server, so when your client requests Discord media, your media repo will ask discord-media.mau.dev, which redirects to cdn.discordapp.com. Your media repo then downloads the media and caches it as remote media (like it does for all federated media).
MSC3860 is supported as of Synapse v1.98.0 and matrix-media-repo v1.4.0. Additionally, while Conduit doesn't opt into redirects, it does follow them, so it should work with the default config.
The software on discord-media.mau.dev is just a Caddy instance with the first example config below, plus a static .well-known file to redirect federation to 443. You can find the raw config at mau.dev/maunium/caddy.
Redirect in reverse proxy
You can also configure your reverse proxy to redirect mxc://discord-media.mau.dev/*
downloads directly to cdn.discordapp.com. This method doesn't involve your
media repo at all, so it already works with most clients. However, it won't
work with servers that don't support MSC3860, as they'd still try to connect to
discord-media.mau.dev, which may be a problem if you want to use your bridge in
federated rooms. Additionally, you may encounter some CORS issues with this
method as cdn.discordapp.com doesn't provide CORS headers for all files (like
webp images and non-inline documents)
Caddy config example
matrix.example.com {
	handle /_matrix/media/*/download/discord-media.mau.dev/* {
		# The redirect must have CORS headers to let web clients follow it.
		header Access-Control-Allow-Origin *
		# Need to use a route directive to make the uri mutations apply before redir
		route {
			# Remove path prefix
			uri path_regexp ^/_matrix/media/.+/download/discord-media\.mau\.dev/ /
			# The mxc patterns use | instead of /, so replace it first turning the path into attachments/1234/5678/filename.png
			uri replace "%7C" /
			# Then redirect to cdn.discordapp.com/attachments/1234/5678/filename.png with HTTP 307
			redir https://cdn.discordapp.com{uri} 307
		}
	}
	# Special-case stickers because they don't have CORS headers on cdn.discordapp.com for some reason
	handle /_matrix/media/*/download/discord-media.mau.dev/stickers|* {
		header Access-Control-Allow-Origin *
		route {
			uri path_regexp ^/_matrix/media/.+/download/discord-media\.mau\.dev/ /
			uri replace "%7C" /
			redir https://media.discordapp.net{uri} 307
		}
	}
	# Do the same for thumbnails, but redirect to media.discordapp.net (which is Discord's thumbnailing server, and happens to use similar width/height params as Matrix)
	# Alternatively, you can point this at cdn.discordapp.com too. Clients shouldn't mind even if they get a bigger image than they asked for.
	handle /_matrix/media/*/thumbnail/discord-media.mau.dev/* {
		header Access-Control-Allow-Origin *
		route {
			uri path_regexp ^/_matrix/media/.+/thumbnail/discord-media\.mau\.dev/ /
			uri replace "%7C" /
			redir https://media.discordapp.net{uri} 307
		}
	}
	# The usual proxying to your homeserver
	handle /_matrix/* {
		reverse_proxy http://localhost:8008
	}
}
Nginx config example
server {
	listen 443;
	server_name matrix.example.com;
	# ... usual /_matrix location block and other stuff ...
	# N.B. If you use a regex pattern for the /_matrix block, it must be below these locations

	location ~ ^/_matrix/media/(?:v3|r0)/download/discord-media.mau.dev/attachments\|([0-9]+)\|([0-9]+)\|(.+)$ {
		add_header Access-Control-Allow-Origin *;
		return 307 https://cdn.discordapp.com/attachments/$1/$2/$3;
	}
	location ~ ^/_matrix/media/(?:v3|r0)/download/discord-media.mau.dev/emojis\|(.+)$ {
		add_header Access-Control-Allow-Origin *;
		return 307 https://cdn.discordapp.com/emojis/$1;
	}
	location ~ ^/_matrix/media/(?:v3|r0)/download/discord-media.mau.dev/stickers\|(.+)$ {
		add_header Access-Control-Allow-Origin *;
		# Stickers don't have CORS headers on cdn.discordapp.com for some reason, so always use media.
		return 307 https://media.discordapp.net/stickers/$1;
	}
	location ~ ^/_matrix/media/(?:v3|r0)/download/discord-media.mau.dev/avatars\|([0-9]+)\|(.+)$ {
		add_header Access-Control-Allow-Origin *;
		return 307 https://cdn.discordapp.com/avatars/$1/$2;
	}

	# Thumbnails (optional-ish)
	location ~ ^/_matrix/media/(?:v3|r0)/thumbnail/discord-media.mau.dev/attachments\|([0-9]+)\|([0-9]+)\|(.+)$ {
		add_header Access-Control-Allow-Origin *;
		return 307 https://media.discordapp.net/attachments/$1/$2/$3?$args;
	}
	location ~ ^/_matrix/media/(?:v3|r0)/thumbnail/discord-media.mau.dev/emojis\|(.+)$ {
		add_header Access-Control-Allow-Origin *;
		return 307 https://media.discordapp.net/emojis/$1?$args;
	}
	location ~ ^/_matrix/media/(?:v3|r0)/thumbnail/discord-media.mau.dev/stickers\|(.+)$ {
		add_header Access-Control-Allow-Origin *;
		return 307 https://media.discordapp.net/stickers/$1?$args;
	}
	location ~ ^/_matrix/media/(?:v3|r0)/thumbnail/discord-media.mau.dev/avatars\|([0-9]+)\|(.+)$ {
		add_header Access-Control-Allow-Origin *;
		return 307 https://media.discordapp.net/avatars/$1/$2?$args;
	}
}
Proxy in reverse proxy
If you want bridged media to work over federation without MSC3860, you can change discord-media.mau.dev to your own server name, and have your reverse proxy actually proxy the downloads instead of just redirecting to cdn.discordapp.com. That way it'll work with all existing servers and clients. The downside of this method is the higher bandwidth use compared to redirecting, and theoretical abuse vectors for spamming the Discord CDN through your server.
When using this example, change discord-media.mau.dev/ in the patterns to
example.com/discord_ (replacing example.com with your own domain). The
discord_ prefix is there so that other media on your domain will still work
normally.
Caddy config example
matrix.example.com {
	handle /_matrix/media/*/download/example.com/discord_* {
		header Access-Control-Allow-Origin *
		# Remove path prefix
		uri path_regexp ^/_matrix/media/.+/download/example\.com/discord_ /
		# The mxc patterns use | instead of /, so replace it first turning it into attachments/1234/5678/filename.png
		uri replace "%7C" /
		reverse_proxy {
			# reverse_proxy automatically includes the uri, so no {uri} at the end
			to https://cdn.discordapp.com
			# Caddy doesn't set the Host header automatically when reverse proxying
			# (because usually reverse proxies are local and don't care about Host headers)
			header_up Host cdn.discordapp.com
		}
	}
	# Do the same for thumbnails, but redirect to media.discordapp.net (which is Discord's thumbnailing server, and happens to use similar width/height params as Matrix)
	# Alternatively, you can point this at cdn.discordapp.com too. Clients shouldn't mind even if they get a bigger image than they asked for.
	handle /_matrix/media/*/thumbnail/example.com/discord_* {
		header Access-Control-Allow-Origin *
		uri path_regexp ^/_matrix/media/.+/thumbnail/example\.com/discord_ /
		uri replace "%7C" /
		reverse_proxy {
			to https://media.discordapp.net
			header_up Host media.discordapp.net
		}
	}
	handle /_matrix/* {
		reverse_proxy http://localhost:8008
	}
}
Nginx config example
server {
	listen 443;
	server_name matrix.example.com;
	# ... usual /_matrix location block and other stuff ...
	# N.B. If you use a regex pattern for the /_matrix block, it must be below these locations

	# You may need to configure a resolver for nginx to be able to resolve cdn.discordapp.com
	#resolver 8.8.8.8;

	location ~ ^/_matrix/media/(?:v3|r0)/download/example.com/discord_attachments\|([0-9]+)\|([0-9]+)\|(.+)$ {
		add_header Access-Control-Allow-Origin *;
		proxy_set_header Host cdn.discordapp.com;
		proxy_pass https://cdn.discordapp.com/attachments/$1/$2/$3;
	}
	location ~ ^/_matrix/media/(?:v3|r0)/download/example.com/discord_emojis\|(.+)$ {
		add_header Access-Control-Allow-Origin *;
		proxy_set_header Host cdn.discordapp.com;
		proxy_pass https://cdn.discordapp.com/emojis/$1;
	}
	location ~ ^/_matrix/media/(?:v3|r0)/download/example.com/discord_stickers\|(.+)$ {
		add_header Access-Control-Allow-Origin *;
		proxy_set_header Host cdn.discordapp.com;
		proxy_pass https://cdn.discordapp.com/stickers/$1;
	}
	location ~ ^/_matrix/media/(?:v3|r0)/download/example.com/discord_avatars\|([0-9]+)\|(.+)$ {
		add_header Access-Control-Allow-Origin *;
		proxy_set_header Host cdn.discordapp.com;
		proxy_pass https://cdn.discordapp.com/avatars/$1/$2;
	}

	# Thumbnails (optional-ish)
	location ~ ^/_matrix/media/(?:v3|r0)/thumbnail/example.com/discord_attachments\|([0-9]+)\|([0-9]+)\|(.+)$ {
		add_header Access-Control-Allow-Origin *;
		proxy_set_header Host media.discordapp.net;
		proxy_pass https://media.discordapp.net/attachments/$1/$2/$3?$args;
	}
	location ~ ^/_matrix/media/(?:v3|r0)/thumbnail/example.com/discord_emojis\|(.+)$ {
		add_header Access-Control-Allow-Origin *;
		proxy_set_header Host media.discordapp.net;
		proxy_pass https://media.discordapp.net/emojis/$1?$args;
	}
	location ~ ^/_matrix/media/(?:v3|r0)/thumbnail/example.com/discord_stickers\|(.+)$ {
		add_header Access-Control-Allow-Origin *;
		proxy_set_header Host media.discordapp.net;
		proxy_pass https://media.discordapp.net/stickers/$1?$args;
	}
	location ~ ^/_matrix/media/(?:v3|r0)/thumbnail/example.com/discord_avatars\|([0-9]+)\|(.+)$ {
		add_header Access-Control-Allow-Origin *;
		proxy_set_header Host media.discordapp.net;
		proxy_pass https://media.discordapp.net/avatars/$1/$2?$args;
	}
}
mautrix-slack
Welcome to the mautrix-slack docs!
Use the sidebar to find the relevant pages. Things that are the same for all bridges, like setting up the bridge, are right below the "Go-based bridges" header. Things specific to mautrix-slack are under this page.
These docs are mostly targeted towards people who are hosting the bridge themselves. If you don't want to host it yourself, you can use a public instance. When using public instances, refer to their instructions and support rooms.
If you run a public instance and wish to list it here, please make a pull request.
Discussion
Matrix room: #slack:maunium.net
Authentication
You may want to use mautrix-manager instead of bot commands if you want to do token login. It will automate extracting cookies so you don't need to mess with browser devtools.
- Open a private chat with the bridge bot. Usually
@slackbot:your.server.- If the bot doesn't accept the invite, see the troubleshooting page
Token login
- Login to the Slack web app in a browser, and acquire the authentication
token and
dcookie from inside the app.- The token starts with
xoxc-and can be found using the browser devtools, in localStorage inside thelocalConfig_v2object:JSON.parse(localStorage.localConfig_v2).teams.YOUR_TEAM_ID_HERE.token - The cookie is named
dand starts withxoxd-.
- The token starts with
- Send
login token <token> <cookie>to the bot.
After login, the bridge will bridge recent chats automatically
(depending on the conversation_count setting).
App login
If using app login for relay mode, it is recommended to create a new Matrix account. If you do this with your primary account, your messages will be bridged with the app's profile rather than a custom profile.
- Create a new Slack app using the app manifest in the bridge repo.
- Create an app-level token for the app to get a
xapp-token. - Install the app in your workspace to get a
xoxb-token. - Send
login appto the bot. - Send the bot token and app-level token when requested.
After login, the bridge will bridge the chats the bot is in automatically.
If using set-relay, any unauthenticated users will be bridged through the app
with a custom name & avatar. Note that the user who did login app will not
get a custom name and avatar (hence the recommendation for a dedicated Matrix
account at the start).
mautrix-gmessages
Welcome to the mautrix-gmessages docs!
Use the sidebar to find the relevant pages. Things that are the same for all bridges, like setting up the bridge, are right below the "Go-based bridges" header. Things specific to mautrix-gmessages are under this page.
These docs are mostly targeted towards people who are hosting the bridge themselves. If you don't want to host it yourself, you can use a public instance. When using public instances, refer to their instructions and support rooms.
If you run a public instance and wish to list it here, please make a pull request.
Discussion
Matrix room: #gmessages:maunium.net
Authentication
- Open a private chat with the bridge bot. Usually
@gmessagesbot:your.server- If the bot doesn't accept the invite, see the troubleshooting page
Google account login
You may want to use mautrix-manager instead of bot commands if you want to do Google login. It will automate extracting cookies so you don't need to mess with browser devtools.
Note that Google Fi's "sync to your Google Account" option is not supported by the bridge even with Google account login. You must choose the normal mode where RCS chats are available (option 1 in https://support.google.com/fi/answer/6188337).
- Send
login googleto start the login. - Log into https://accounts.google.com/AccountChooser?continue=https://messages.google.com/web/config
with your Google account in a private window.
- Using a private window is required to ensure the cookies don't get rotated by the browser, and because the bridge doesn't support cookies linked to multiple accounts.
- You also can't use a browser with Device Bound Session Credentials enabled. Firefox hasn't implemented that at all and should work, Chrome also allows disabling the feature via flags. mautrix-manager will always work.
- The
continueURL in the link is chosen so that it would only log into your Google account and not try to pair the browser. Make sure you don't navigate anywhere else inside the private window.
- Copy the
/web/configrequest as cURL from the browser devtools network tab. You can just reload the page to make the request show up if you didn't have devtools open before. If using windows, choose the (bash) option for copying instead of (cmd).- Alternatively, you can make a key-value JSON object containing at least
the
SID,HSID,SSID,OSID,APISIDandSAPISIDcookies. Sometimes Google also requires__Secure-1PSIDTSto be included.
- Alternatively, you can make a key-value JSON object containing at least
the
- Send the curl command (or JSON object) to the bot.
- Open Google Messages on your phone and tap on the emoji the bridge bot sent.
- Finally, the bot should inform you of a successful login.
QR login
This method was much easier to set up, but it appears Google has killed it :(
Old instructions
- Send
login qrto start the login. - Log in by scanning the QR code. If the code expires before you scan it, the
bridge will send an error to notify you.
- On your phone, open
 Messages by Google.
 - Tap Menu
 from your conversation list and select Device pairing.
 - Tap QR code scanner and point your phone at the image sent by the bot.
- On your phone, open
- Finally, the bot should inform you of a successful login.
- The bridge will create portal rooms for recent chats. The number is configurable and defaults to 25 chats with 50 messages backfilled in each chat.
As all messages are proxied through the app, your phone must be connected to the internet for the bridge to work.
Logging out
Simply run the logout management command.
mautrix-gvoice
Welcome to the mautrix-gvoice docs!
Use the sidebar to find the relevant pages. Things that are the same for all bridges, like setting up the bridge, are right below the "Go-based bridges" header. Things specific to mautrix-gvoice are under this page.
These docs are mostly targeted towards people who are hosting the bridge themselves. If you don't want to host it yourself, you can use a public instance. When using public instances, refer to their instructions and support rooms.
If you run a public instance and wish to list it here, please make a pull request.
Discussion
Matrix room: #gvoice:maunium.net
Authentication
You may want to use mautrix-manager instead of bot commands. It will automate extracting cookies so you don't need to mess with browser devtools.
- Open a private chat with the bridge bot. Usually
@gmessagesbot:your.server- If the bot doesn't accept the invite, see the troubleshooting page
- Send
loginto start the login. - Log into https://voice.google.com with your Google account.
- Using a private window is required to ensure the cookies don't get rotated by the browser, and because the bridge doesn't support cookies linked to multiple accounts.
- You also can't use a browser with Device Bound Session Credentials enabled. Firefox hasn't implemented that at all and should work, Chrome also allows disabling the feature via flags. mautrix-manager will always work.
- Make a key-value JSON object containing at least the
SID,HSID,SSID,OSID,APISIDandSAPISIDcookies. Sometimes Google also requires__Secure-1PSIDTSto be included. Alternatively, you can copy a request with the cookies as cURL from the network tab and paste that to the bot. - Send the JSON object to the bot.
- The bot should inform you of a successful login and bridge recent chats.
mautrix-signal
Welcome to the mautrix-signal docs!
Use the sidebar to find the relevant pages. Things that are the same for all bridges, like setting up the bridge, are right below the "Go-based bridges" header. Things specific to mautrix-signal are under this page.
These docs are mostly targeted towards people who are hosting the bridge themselves. If you don't want to host it yourself, you can use a public instance. When using public instances, refer to their instructions and support rooms.
If you run a public instance and wish to list it here, please make a pull request.
Discussion
Matrix room: #signal:maunium.net
Authentication
- Open a private chat with the bridge bot. Usually
@signalbot:your.server- If the bot doesn't accept the invite, see the troubleshooting page
Linking as secondary device
- Go to "Linked Devices" in the Signal app settings and add a new device.
- Send
loginto the bridge bot. - Scan the QR code the bridge sends you.
- If backfill is enabled in the bridge config, Signal will ask whether you want to transfer message history. You can choose whichever option you want.
- Finally, the bot should inform you of a successful login.
- If you chose to transfer history, recent chats should be created and backfilled automatically. If not, chats will be bridged when you receive new messages
Registering as the primary device
Registering as the primary device is no longer supported directly in the bridge. Using an official mobile app is recommended. However, if you don't want to use those, signal-cli works quite well too.
signal-cli instructions
- Download the latest release of signal-cli.
- Run
signal-cli -u +123456789 register - Go to https://signalcaptchas.org/registration/generate.html to generate a
captcha code.
- The page will redirect you to a
signalcaptcha://URI after solving the captcha. At least on Firefox, you need to have the devtools console open to be able to see and copy the URI. - Alternatively, you can wait for a few seconds for the "Open Signal" button to appear, then right click on it and copy the link.
- The page will redirect you to a
- Run
signal-cli -u +123456789 register --captcha 'signalcaptcha://signal-hcaptcha...'with the generated captcha code. - Run
signal-cli -u +123456789 verify 123456(123456 being the code sent over SMS). - Send
loginto the bridge bot. - Run
signal-cli -u +123456789 addDevice --uri 'sgnl://...'with the URI returned by the bridge bot. - The bot should inform you of a successful login.
- Run
signal-cli -u +123456789 receiveoccasionally to make sure the registration remains active.- Optionally use the
-t -1flag to make it run in the background. However, it needs occasional updating and it might also crash randomly, so you shouldn't leave it completely unattended.
- Optionally use the
mautrix-meta
Welcome to the mautrix-meta docs!
Use the sidebar to find the relevant pages. Things that are the same for all bridges, like setting up the bridge, are right below the "Go-based bridges" header. Things specific to mautrix-meta are under this page.
These docs are mostly targeted towards people who are hosting the bridge themselves. If you don't want to host it yourself, you can use a public instance. When using public instances, refer to their instructions and support rooms.
If you run a public instance and wish to list it here, please make a pull request.
Discussion
Matrix room: #meta:maunium.net
Authentication
You may want to use mautrix-manager instead of bot commands. It will automate extracting cookies so you don't need to mess with browser devtools.
- Open a private chat with the bridge bot. Usually
@instagrambot:your.serveror@facebookbot:your.server- If the bot doesn't accept the invite, see the troubleshooting page
- Send
loginto the bridge bot. The bot should ask you to paste cookies, which will happen in step 6.- If the bridge is not configured with a specific
mode, then you also have to specify the mode here (facebook, messenger or instagram).
- If the bridge is not configured with a specific
- Open the website in a private window (facebook.com, messenger.com or instagram.com, depending on what you configured the bridge to use).
- Open browser devtools and go to the network tab.
Select "XHR" as the request type and search for
graphql. - Log in normally.
- Right click one of the requests in devtools,
choose "Copy" (Chrome) or "Copy Value" (Firefox), then "Copy as cURL".
- Any request with the correct cookies should work, graphql is just used as an example that should be easy to find.
- Note for windows users: Make sure to select "Copy as cURL (POSIX)", not "(Windows)", if given both options.
- You can also find the cookies manually and send them to the bot as a
simple key-value JSON object. The relevant cookies are:
- Instagram:
sessionid,csrftoken,mid,ig_did,ds_user_id - Facebook:
datr,c_user,sb,xs
- Instagram:
- Paste the copied data to the bridge bot.
- The bot should inform you of a successful login and sync recent chats.
N.B. In some cases, Meta may decide your account has suspicious activity and block you until you do some tasks like completing a captcha, adding a phone number or resetting your password. It is recommended to have two-factor authentication enabled to reduce the risk of such blocks.
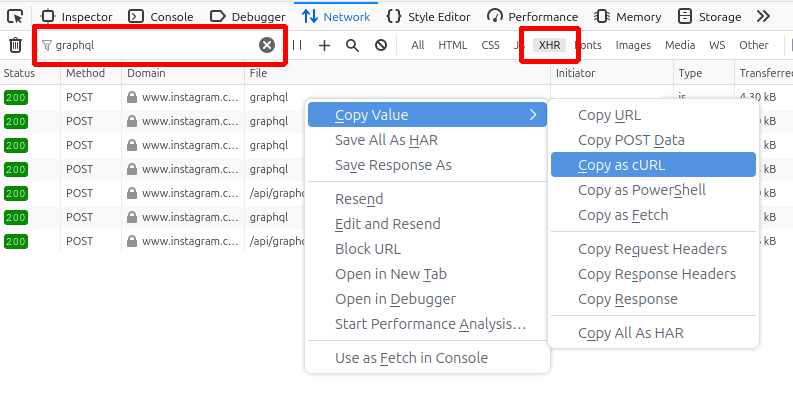
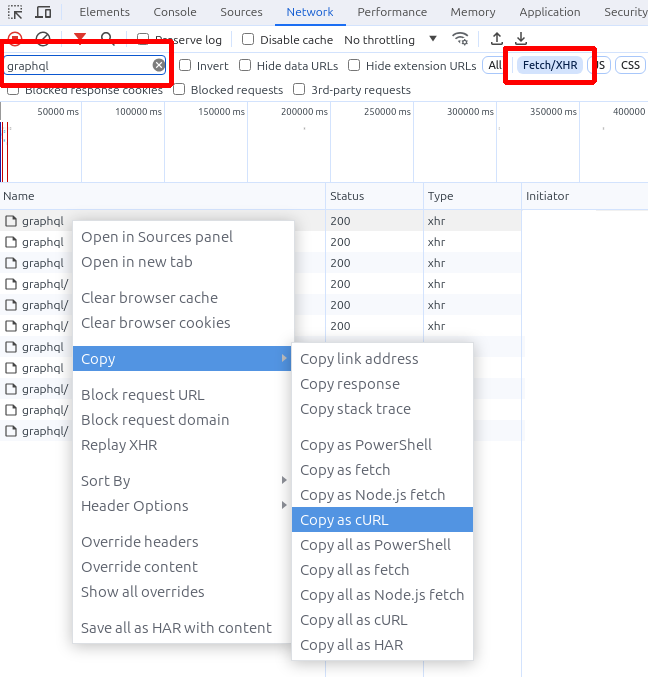
Migrating from mautrix-facebook
Migration from mautrix-facebook was removed in v0.4.0. v0.3.2 is the last version that can be used to migrate from mautrix-facebook.
- Either create a new database for mautrix-meta, or rename the old one and create a new one with the original name.
- Configure mautrix-meta normally. You must use the same bot username and
username template to migrate old chats. You can also just reuse the same
registration file, as long as you keep the same hostname/port and as/hs_token.
- You can't use the same config file as mautrix-facebook, make a new one and copy the relevant values.
- Don't start the bridge yet.
- Run
./mautrix-meta --db-migrate-from postgres://user:pass@host/olddb(or--db-migrate-from /path/to/old.dbfor SQLite). - Optionally, manually transfer the tables starting with
crypto_(justpg_dump+ import to new db for each table). - Run the bridge normally.
mautrix-instagram can not be migrated, you just have to delete the rooms and start with a fresh db. You can still reuse the username template if you want to.
mautrix-twitter
Welcome to the mautrix-twitter docs!
Use the sidebar to find the relevant pages. Things that are the same for all bridges, like setting up the bridge, are right below the "Go-based bridges" header. Things specific to mautrix-twitter are under this page.
These docs are mostly targeted towards people who are hosting the bridge themselves. If you don't want to host it yourself, you can use a public instance. When using public instances, refer to their instructions and support rooms.
If you run a public instance and wish to list it here, please make a pull request.
Discussion
Matrix room: #twitter:maunium.net
Authentication
You may want to use mautrix-manager instead of bot commands. It will automate extracting cookies so you don't need to mess with browser devtools.
- Open a private chat with the bridge bot. Usually
@twitterbot:your.server.- If the bot doesn't accept the invite, see the troubleshooting page
- Log into Twitter in a private browser window.
- Press F12 to open developer tools.
- Select the "Application" (Chrome) or "Storage" (Firefox) tab.
- In the sidebar, expand "Cookies" and select
https://twitter.com. - In the cookie list, find the values for
ct0andauth_token.
- Send
login ct0 authto the bot (replacingct0andauthwith the respective values). - Recent chats should now get portals automatically. Other chats will get portals as you receive messages.
mautrix-bluesky
Welcome to the mautrix-bluesky docs!
Use the sidebar to find the relevant pages. Things that are the same for all bridges, like setting up the bridge, are right below the "Go-based bridges" header. Things specific to mautrix-bluesky are under this page.
These docs are mostly targeted towards people who are hosting the bridge themselves. If you don't want to host it yourself, you can use a public instance. When using public instances, refer to their instructions and support rooms.
- No public instances yet :(
If you run a public instance and wish to list it here, please make a pull request.
Discussion
Matrix room: #bluesky:maunium.net
Authentication
- Open a private chat with the bridge bot. Usually
@blueskybot:your.server- If the bot doesn't accept the invite, see the troubleshooting page
- Send
loginto start the login. - Send your Bluesky PDS domain. If you aren't running your own PDS, you're
probably using
bsky.social. - Send your Bluesky account email address or handle (handles are domains like
username.bsky.socialor a custom domain that you connected to Bluesky). - Send your Bluesky account password. If you have 2-factor authentication, create an app-specific password.
- The bot should inform you of a successful login and bridge recent chats.
mautrix-linkedin
Welcome to the mautrix-linkedin docs!
Use the sidebar to find the relevant pages. Things that are the same for all bridges, like setting up the bridge, are right below the "Go-based bridges" header. Things specific to mautrix-linkedin are under this page.
These docs are mostly targeted towards people who are hosting the bridge themselves. If you don't want to host it yourself, you can use a public instance. When using public instances, refer to their instructions and support rooms.
If you run a public instance and wish to list it here, please make a pull request.
Discussion
Matrix room: #linkedin:maunium.net
Authentication
You may want to use mautrix-manager instead of bot commands. It will automate extracting cookies so you don't need to mess with browser devtools.
- Open a private chat with the bridge bot. Usually
@linkedinbot:your.server- If the bot doesn't accept the invite, see the troubleshooting page
- Send
loginto start the login. - Open the website in a private window and login normally.
- Note: you should either use Chrome or at least change your user agent to match the one used by the bridge (https://github.com/mautrix/linkedin/blob/main/pkg/linkedingo/client.go#L30), as LinkedIn doesn't like cookies being used by different user agents. mautrix-manager should automatically use the correct user agent.
- Open browser devtools, go to the network tab, select "XHR" as the request
type and search for
graphql. Right click one of the requests and choose "Copy", then "Copy as cURL". - Paste the copied cURL string to the bot.
- The bot should inform you of a successful login and bridge recent chats.
mautrix-zulip
Welcome to the mautrix-zulip docs!
Use the sidebar to find the relevant pages. Things that are the same for all bridges, like setting up the bridge, are right below the "Go-based bridges" header. Things specific to mautrix-zulip are under this page.
These docs are mostly targeted towards people who are hosting the bridge themselves. If you don't want to host it yourself, you can use a public instance. When using public instances, refer to their instructions and support rooms.
- No public instances yet :(
If you run a public instance and wish to list it here, please make a pull request.
Discussion
Matrix room: #zulip:maunium.net
Authentication
- Open a private chat with the bridge bot. Usually
@zulipbot:your.server- If the bot doesn't accept the invite, see the troubleshooting page
- Send
loginto start the login. - Send your Zulip URL, e.g.
https://yourteam.zulipchat.com - Send your Zulip login email
- Send your Zulip API token, which you can find in Personal settings -> Account & privacy -> Manage your API key. See the Zulip docs for more info.
- The bot should inform you of a successful login.
mautrix-irc
Welcome to the mautrix-irc docs!
Use the sidebar to find the relevant pages. Things that are the same for all bridges, like setting up the bridge, are right below the "Go-based bridges" header. Things specific to mautrix-irc are under this page.
These docs are mostly targeted towards people who are hosting the bridge themselves. If you don't want to host it yourself, you can use a public instance. When using public instances, refer to their instructions and support rooms.
- No public instances yet :(
If you run a public instance and wish to list it here, please make a pull request.
Discussion
Matrix room: #irc:maunium.net
Authentication
- Open a private chat with the bridge bot. Usually
@ircbot:your.server- If the bot doesn't accept the invite, see the troubleshooting page
- Make sure you the network you want is listed in the bridge config.
- Send
loginto start the login. - Enter the name of the network you want to log into.
The name must match a key in the
networksmap in the config. - Enter the nick you want to use.
- If you want to log into NickServ, enter the username and password to use for
SASL separated by a colon, i.e.
username:password. If you don't want to authenticate, just send a colon: - The bot should inform you of a successful login and will start connecting to IRC. The connection may fail after a successful login if the configuration or credentials are incorrect.
mautrix-imessage
Welcome to the mautrix-imessage docs!
mautrix-imessage is a Matrix-iMessage puppeting bridge. The bridge has three different ways to connect to iMessage:
- Normal Mac. Built into mautrix-imessage. Uses AppleScript to send, reads the iMessage SQLite database to receive, and uses Contacts.framework for contact list access.
- Mac with SIP disabled. Uses Barcelona to hook into Apple's private iMessage frameworks on a Mac. Requires disabling SIP and AMFI to be able to hook into private frameworks.
Jailbroken iOS. Uses Brooklyn to hook into Apple's private iMessage frameworks on a jailbroken iOS device.32-bit support has been deprecated, Barcelona can be used on newer iOS devices.- Additionally, there's android-sms, an Android app that implements the same
IPC protocol as Brooklyn and Barcelona to bridge SMS from an Android phone.
- Note that the Google Messages bridge is now recommended over android-sms.
You can find setup instructions for each of the connectors in the sidebar.
This bridge essentially has to be self-hosted, so you likely won't find public instances on normal Matrix servers. However, if you have a Beeper account, you can self-host the bridge using bbctl without self-hosting a Matrix server.
Discussion
Matrix room: #imessage:maunium.net
iMessage bridge setup (macOS)
Please note that everything in these docs are meant for server admins who want to self-host the bridge. If you're just looking to use the bridges, check out Beeper, which provides fully managed instances of all of these bridges.
Requirements
- A computer running a reasonably new version of macOS.
- The bridge requires full disk access in privacy settings to read your chat database.
- A Matrix homeserver that supports application services (e.g. Synapse). You need access to register an appservice, which usually involves editing the homeserver config file.
- A websocket proxy to receive appservice transactions.
If you want to compile the bridge manually (which is not required), you'll also need:
- Go 1.19+ (download & installation instructions at https://go.dev/doc/install).
- libolm3 with dev headers (
brew install libolm). - Optionally libheif with dev headers for heif -> jpeg conversion (
brew install libheif).
Installation
You may either compile the bridge manually or download a prebuilt executable from the mau.dev CI.
Compiling manually
- Clone the repo with
git clone https://github.com/mautrix/imessage.git. - Enter the directory (
cd mautrix-imessage). - Run
./build.shto fetch Go dependencies and compile (build.shwill simply callgo buildwith some additional flags).
Downloading a prebuilt executable
- Go to https://mau.dev/mautrix/imessage/-/pipelines?scope=branches&page=1
- Find the entry for the
masterbranch and click the download button on the right-hand side in the list.- There are three entries: universal, arm64 (Apple Silicon) and amd64 (Intel). You can either pick universal, or the specific architecture depending on what Mac you have.
- Extract the downloaded zip file into a new directory.
Configuring and running
- Copy
example-config.yamltoconfig.yaml - Update the config to your liking.
- You need to make sure that the
addressanddomainfield point to your homeserver. - You will also need to add your user ID to the
bridgesection.
- You need to make sure that the
- Generate the appservice registration file by running
./mautrix-imessage -g.- You can use the
-cand-rflags to change the location of the config and registration files. They default toconfig.yamlandregistration.yamlrespectively.
- You can use the
- Set up mautrix-wsproxy.
- Update your registration file so the
urlfield points to wsproxy (e.g.http://localhost:29331, this is where your homeserver reaches wsproxy), and make sure thewebsocket_proxyfield in the bridge config also points to wsproxy (e.g.ws://matrix.example.com:29331, where the bridge reaches wsproxy). - Register the bridge on your homeserver (see Registering appservices).
- Run the bridge with
./mautrix-imessage. - If/when the bridge fails to initialize the iMessage connector with the
operation not permittederror, go to System Preferences -> Security & Privacy -> Privacy -> Full Disk Access and grant access to the terminal you're running the bridge in.
iMessage bridge setup (macOS without SIP)
Note: Barcelona is no longer maintained and may not work on recent macOS versions. The normal Mac connector will likely work better.
Please note that everything in these docs are meant for server admins who want to self-host the bridge. If you're just looking to use the bridges, check out Beeper, which provides fully managed instances of all of these bridges.
Requirements
- A computer running macOS 11 or higher, with SIP and AMFI disabled (see instructions below).
- A Matrix homeserver that supports application services (e.g. Synapse). You need access to register an appservice, which usually involves editing the homeserver config file.
- A websocket proxy to receive appservice transactions.
If you want to compile the bridge manually (which is not required), you'll also need:
- Go 1.19+ (download & installation instructions at https://go.dev/doc/install).
- libolm3 with dev headers (
brew install libolm). - Optionally libheif with dev headers for heif -> jpeg conversion (
brew install libheif). - Xcode 14.2+ if you want to build Barcelona yourself.
Installation
This form of the bridge consists of two components: Barcelona for connecting to iMessage and mautrix-imessage for connecting to Matrix. mautrix-imessage will run Barcelona as a subprocess and they communicate over stdio.
You may either compile the bridge and Barcelona manually, or download prebuilt executables from the mau.dev CI and GitHub actions respectively.
Because Barcelona hooks into Apple's private APIs, you must disable SIP (System Integrity Protection) and AMFI (Apple Mobile File Integrity) on the Mac for it to work. Disabling SIP will make your Mac less secure, so you should only do it on a Mac that you won't use for anything else.
Compiling manually
- Clone the repo with
git clone https://github.com/mautrix/imessage.git. - Enter the directory (
cd mautrix-imessage). - Run
./build.shto fetch Go dependencies and compile (build.shwill simply callgo buildwith some additional flags). - Refer to the Barcelona build instructions for building Barcelona.
Downloading prebuilt executables
- Go to https://mau.dev/mautrix/imessage/-/pipelines?scope=branches&page=1
- Find the entry for the
masterbranch and click the download button on the right-hand side in the list and choose "build universal". - Extract the downloaded zip file into a new directory.
- Download
darwin-barcelona-mautrixfrom https://github.com/beeper/barcelona/actions (latest direct download).
Disabling SIP and AMFI
Disabling SIP and AMFI will make your Mac significantly less secure.
- Boot into recovery mode (hold Command+R while booting) and open a terminal
- Run
csrutil disableto disable SIP - Run
nvram boot-args="amfi_get_out_of_my_way=0x1"to disable AMFI- If you run other things like Electron apps on the Mac (which you definitely
should not), you may want to add
ipc_control_port_options=0to prevent those from breaking.
- If you run other things like Electron apps on the Mac (which you definitely
should not), you may want to add
If you are running macOS in a VM (e.g. through OSX-KVM) you may need to
disable AMFI with a boot option. Assuming you are using OSX-KVM and OpenCore,
open the config.plist (in EFI/OC/config.plist) and change the key
boot-args to add amfi_get_out_of_my_way=0x1:
<key>boot-args</key>
<string>-v keepsyms=1 tlbto_us=0 vti=9 amfi_get_out_of_my_way=0x1</string>
You can also refer to Apple's official documentation on disabling SIP.
Configuring and running
- Follow steps 1-6 from the normal macOS setup
- Install Barcelona's com.apple.security.xpc.plist to
/Library/Preferences/com.apple.security.xpc.plist - In the
imessagesection of the config, changeplatformtomac-nosipand setimessage_rest_pathto the path to thedarwin-barcelona-mautrixexecutable you downloaded or compiled. - Run the bridge with
./mautrix-imessage.
iMessage bridge setup (iOS)
DEPRECATED
mautrix-imessage has dropped support for 32-bit iOS devices, so this Brooklyn-based bridge setup is now deprecated. Newer iOS-based devices can use Barcelona (which is meant for macOS without SIP, but works on jailbroken iOS). However, instructions for Barcelona on iOS are not yet available here.
If you still want to use Brooklyn with an old iOS device, the last commit that supports Go 1.14 and 32-bit iOS is 31bc6e28
Please note that everything in these docs are meant for server admins who want to self-host the bridge. If you're just looking to use the bridges, check out Beeper, which provides fully managed instances of all of these bridges.
Requirements
- A jailbroken iOS device, minimum and recommended is iPhone 4S with iOS 8.4(.1).
- A Matrix homeserver that supports application services (e.g. Synapse). You need access to register an appservice, which usually involves editing the homeserver config file.
- A websocket proxy to receive appservice transactions.
Installation
The bridge consists of two components: Brooklyn for connecting to iMessage and mautrix-imessage for connecting to Matrix. The Brooklyn app runs mautrix-imessage as a subprocess and they communicate over stdio.
The recommended way to install the app is getting a precompiled build from the Cydia repo. You can technically also compile everything yourself, but that is less documented.
Compiling manually
There are instructions for compiling Brooklyn in the GitHub repo.
Compiling mautrix-imessage for darwin/armv7 is more complicated and not currently documented. For more recent devices (i.e. armv8/arm64), it should be as simple as compiling mautrix-imessage on a Mac with Apple Silicon.
Precompiled builds
You can get the Brooklyn app with a bundled mautrix-imessage from the Cydia repo. The repo is currently available at http://maunium.mau.life/brooklyn/ (repo URL subject to change). After adding the repo in Cydia, simply install the "Brooklyn" package from the repo.
Configuring and running
- Get the example config and fill it out. You'll at least need to:
- Fill everything in the
homeserversection. - Set
bridge->userto your MXID. - Change
imessage->platformtoios. - Generate random tokens for the
as_tokenandhs_tokenfields.
- Fill everything in the
- Get the example registration and copy the relevant values from the config.
- Set up mautrix-wsproxy.
- Register the bridge on your homeserver (see Registering appservices).
- Serve the config file with the webserver of your choice. It's recommended
to use a random file name or add HTTP basic auth to prevent other people
from reading your config.
- HTTP basic auth documentation: Caddy, nginx, Apache
- N.B. Due to a bug in Brooklyn, the URL must be lowercase.
- Generate a QR code with the URL to your config
(e.g.
echo -n https://user:pass@example.com/your-config.yaml | qrencode -t ansiutf8). - Scan the QR code with Brooklyn.
Troubleshooting
The brooklyn app keeps showing the QR Code reader popup
- Connect your iPhone to a Mac and open the Console app to see logs
- Filter for "Brooklyn" to see logs
- If you see
Brooklyn mautrix-imessage sent error:Failed to download config: failed to open config.yaml for writing config: open config.yaml: permission denied, use the following to mitigate:- install OpenSSH via Cydia
- ssh to the iPhone (find out IP via settings, user is root, password is alpine)
- the first ssh will take minutes because SSH keys are generated
- once you are ssh'ed into your phone, run chmod 777 /var/mobile/Documents/mautrix-imessage-armv7
- scan QR Code again
- check that the config file downloaded by running the following over SSH on your iPhone:
cat /var/mobile/Documents/mautrix-imessage-armv7/config.yaml
- If you are seeing
[ERROR] Error in appservice websocket: failed to open websocket: dial tcp [::1]:29331: connect: connection refusedthat means that your phone cannot talk tomautrix-wsproxy, make sure that the configured value for homeserver -> websocket_proxy can be resolved from your phone. You can check this by installingnetcatin Cydia and then running the following over ssh:nc -zv <hostname> 29331to see if it connects
SMS forwarding on iOS
If you're running the bridge on an old jailbroken iPhone, but want to keep your SIM card in your main iPhone, you can use iMessage's SMS forwarding feature to still send and receive text messages through the bridge.
By default, outgoing SMSes will only be forwarded on non-iPhone devices, and it'll just throw a no sim card installed error if you try to send an SMS. However, Brooklyn includes a bypass that can make the iPhone act like iPads and Macs and forward the SMS through another iPhone.
To enable the bypass:
- Deactivate iMessage (Settings -> Messages -> switch off "iMessage").
- Enable the bypass in Settings -> Brooklyn.
- Reset network settings (Settings -> General -> Reset -> Reset Network Settings).
- The iPhone will forget your Wi-Fi settings and reboot.
- Set up your Wi-Fi connection again.
- Reactivate iMessage (same switch as step 1).
iMessage SMS bridge setup (Android)
This bridge is deprecated, the Google Messages bridge is recommended instead. However, it should still work to some extent if you follow the instructions carefully.
In addition to being an iMessage bridge, mautrix-imessage can run on Android to bridge SMS messages from your phone. The Android SMS bridge works similar to the jailbroken iOS setup, but instead of Brooklyn, the wrapper app for the bridge is android-sms.
Please note that everything in these docs are meant for server admins who want to self-host the bridge. If you're just looking to use the bridges, check out Beeper, which provides fully managed instances of all of these bridges.
Requirements
- An Android device with Android 5 or higher.
- A Matrix homeserver that supports application services (e.g. Synapse). You need access to register an appservice, which usually involves editing the homeserver config file.
- A websocket proxy to receive appservice transactions. If you want end-to-bridge encryption, the sync proxy component (mentioned in the websocket proxy readme) is also recommended to minimize battery usage.
Installation
Compiling manually
- Install the latest Android SDK and NDK version 21.3.6528147.
- Clone the android-sms repo
- The main branch doesn't currently work as a standalone app, so use the
0.1.89tag. - Use
--recursivewhen cloning orgit submodule init && git submodule updateafter cloning to ensure that the mautrix-imessage submodule is present.
- The main branch doesn't currently work as a standalone app, so use the
- Run
./mautrix.shto compile mautrix-imessage for Android. - Put your
config.yamlinapp/src/main/assets/(create the directory if it doesn't exist). - Run
./gradlew installDebugto compile the app and install it over ADB.
Precompiled builds
There are currently no precompiled versions available, as the config must be bundled at compile time. Support for setting up with QR code similar to the iOS setup will be added soon(™), and precompiled APKs will be available in the GitLab CI after that.
Configuring and running
- Get the example config and fill it out. You'll at least need to:
- Fill everything in the
homeserversection. - Set
bridge->userto your MXID. - Change
imessage->platformtoandroid. - Generate random tokens for the
as_tokenandhs_tokenfields. - The database and log directory paths must be absolute paths in the
/data/user/0/com.beeper.sms.appdirectory.
- Fill everything in the
- Get the example registration and copy the relevant values from the config.
- Set up mautrix-wsproxy (and the sync proxy).
- Add the path to the registration file to your Synapse
homeserver.yamlunderapp_service_config_files, then restart Synapse. - Build and run the android-sms app with your config.
- Open the app and grant it SMS permissions to start the bridge.
If something is wrong and you need to view the bridge logs, use logcat:
adb logcat --pid=$(adb shell ps | grep com.beeper.sms.app | awk '{ print $2 }')
(note that the pid will change if the app is restarted, so you'll have to re-run the command after restarts)